Are you struggling with dead zones or slow internet in some parts of your home? Adding a new node to your mesh WiFi system can fix those issues fast.
But if you’re not sure where to start or worried about making mistakes, you’re in the right place. This guide will walk you through simple, step-by-step instructions to expand your WiFi coverage effortlessly. By the end, you’ll enjoy a stronger, more reliable connection everywhere you need it.
Let’s get your network working better for you.

Credit: m.youtube.com
Benefits Of Adding A Node
Adding a node to your mesh WiFi system brings several tangible benefits that directly improve your home or office internet experience. It’s not just about expanding coverage; it’s about making your connection stronger, faster, and more reliable wherever you need it. Let’s look at how adding a node can make a real difference in your daily online activities.
Improved Coverage
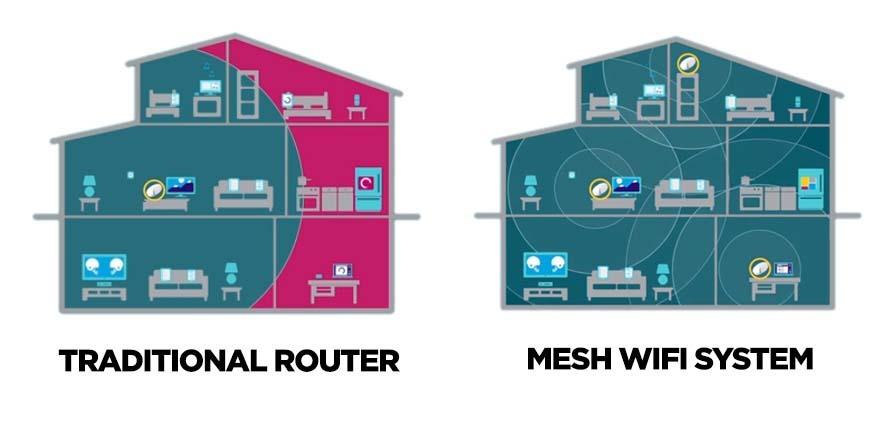
Adding a node extends your WiFi signal into areas that your main router can’t reach. This means rooms or corners that used to have weak or no connection now enjoy steady internet. Imagine streaming your favorite show in the backyard without worrying about losing the signal.
More coverage means your devices stay connected no matter where you move around. You don’t have to rely on awkward positioning of your main router anymore.
Enhanced Network Speed
With an extra node, your devices can connect to the closest point instead of all of them crowding the main router. This reduces congestion and improves overall speed. If you work from home, you’ll notice quicker downloads and smoother video calls.
Think about a time you experienced buffering or slow loading at home. Adding a node helps avoid these frustrating moments by sharing the load efficiently across the network.
Reduced Dead Zones
Dead zones are frustrating spots where your WiFi just won’t reach. Adding a node fills these gaps by placing a new access point closer to these problem areas. You can finally enjoy seamless connectivity in the basement, garage, or any tricky spot in your home.
Have you ever missed an important email or call because of a dead zone? Adding nodes helps prevent those missed connections and keeps you online where you need it most.
Preparing For Node Addition
Preparing to add a new node to your mesh WiFi system is key for a smooth setup. It helps ensure strong network performance and avoids common problems. Careful preparation makes the process quick and easy.
Check Compatibility
Confirm the new node works with your current mesh WiFi system. Different brands or models may not connect well. Visit the manufacturer’s website for compatibility details. Firmware updates might be needed to match devices. Use nodes from the same product line if possible.
Choose Optimal Location
Pick a spot where the new node can connect to the main router and other nodes. Avoid walls, metal objects, and appliances that block signals. Place the node halfway between the router and the area with weak WiFi. Higher locations often improve coverage. Test the signal strength before final placement.
Gather Necessary Equipment
Collect all tools and devices for setup. This includes the new mesh node, power adapter, and Ethernet cable if needed. Have your smartphone or computer ready to run the setup app. Keep your WiFi password handy. A stable power source near the chosen location is essential.
Step-by-step Node Setup
Adding a new node to your mesh WiFi system improves coverage and speeds up your network. Follow these simple steps to set up the new node smoothly. Each step ensures your new node works well with the existing network.
Power On The New Node
Plug the new node into a power outlet near your router or the main node. Wait for the LED lights to show it is powered on. Lights usually blink or change color to indicate readiness.
Connect To Existing Mesh Network
Use your mesh WiFi app or control panel to find the new node. The app will search for available nodes nearby. Select the new node to join your mesh network. This process links the node with your current setup.
Configure Node Settings
Adjust the new node’s settings in the app. Set the location or name for easy identification. Confirm any updates or firmware installations to keep the node secure. Save the settings and wait for the node to sync fully.

Credit: www.reddit.com
Optimizing Node Placement
Placing nodes near walls or large objects can cause weak signals. Choose open areas with good line-of-sight for stronger connections. Avoid placing nodes too far apart to keep the mesh network stable and fast.
Optimizing the placement of your mesh WiFi nodes is crucial for maximizing the network’s performance. Imagine having a seamless internet experience in every corner of your home without any frustrating dead zones. This is achievable by smartly positioning your nodes. Let’s explore how you can make the most of your mesh WiFi system by ensuring optimal node placement.Avoid Physical Obstructions
Physical barriers like walls, floors, and furniture can significantly weaken your WiFi signal. It’s essential to place your nodes in open areas where possible. Consider elevating them off the ground on a shelf or table to minimize interference. If you’re in a multi-story home, avoid placing nodes in the basement or behind closed doors. Reflecting on a personal experience, when I moved a node from a closed cabinet to an open hallway, the connection in my living room improved dramatically. Have you assessed your home’s layout for potential barriers?Maintain Signal Overlap
For a robust network, ensure there’s a slight overlap between nodes’ coverage areas. This overlap prevents dead zones and keeps your devices connected when you move around. Aim for a distance that allows a smooth handover from one node to another. A practical tip is to use your phone’s WiFi signal strength indicator to find the sweet spot. When I positioned my second node just within the range of the first, I noticed a seamless switch between nodes without any drop in connectivity. Are your nodes close enough to maintain overlap?Consider Device Density
The number of devices connected to your network can influence where you place your nodes. If one area of your home has a higher concentration of devices, it may need its dedicated node to handle the load efficiently. In my household, the family room sees the most device activity. By placing a node nearby, everyone enjoyed faster speeds and fewer interruptions. Do you have a hotspot in your home that could benefit from a dedicated node? By focusing on these elements, you can ensure your mesh WiFi system operates at peak efficiency, providing consistent and reliable connectivity throughout your space.Troubleshooting Common Issues
Adding a new node to your mesh WiFi system usually goes smoothly, but sometimes issues pop up. Troubleshooting these common problems helps you get your network back on track quickly. Understanding what might go wrong and how to fix it saves time and frustration.
Node Not Connecting
If your new node refuses to connect, start by checking its distance from the main router or other nodes. Too far away, and it might not establish a stable link. Try moving it closer to see if it connects.
Also, ensure the node is powered on and that you’ve followed the setup instructions correctly. Sometimes a simple reset of the node or the main router clears connection hiccups. Have you checked if your mesh system’s app shows any error messages? These can give clues about what’s blocking the connection.
Weak Signal Problems
Even after connecting, a node might deliver a weak signal. Walls, furniture, and appliances can interfere with WiFi signals in surprising ways. Try repositioning the node to a more open space, away from thick walls or metal objects.
Consider the node’s height too—placing it higher often improves coverage. If your home has multiple floors, adding nodes on each level usually helps balance the signal. Are you monitoring signal strength through your mesh system’s app? It can guide you to the optimal node placement.
Firmware Update Tips
Outdated firmware often causes connectivity and performance issues. Check your mesh system’s app regularly for firmware updates and install them promptly. Updates fix bugs and improve compatibility with new nodes.
Make sure your nodes stay powered on and connected during updates to avoid interruptions. If an update fails, try restarting the node and your router, then attempt the update again. Have you set up automatic updates? This can keep your system running smoothly without manual effort.
Maintaining Your Mesh Network
Maintaining your mesh WiFi network ensures it stays fast, reliable, and secure over time. Just adding nodes isn’t enough; you need to keep an eye on how everything performs and update your system regularly. This ongoing care prevents slowdowns and keeps your home or office connected seamlessly.
Regular Firmware Updates
Firmware updates are like tune-ups for your mesh system. They fix bugs, improve security, and often add new features.
Check your router’s app or web interface at least once a month to see if updates are available. Ignoring these updates can leave your network vulnerable to attacks or cause unexpected performance drops.
Monitor Network Performance
Keep track of your network speed and coverage regularly. Use built-in tools or third-party apps to test your WiFi signal strength and speed in different rooms.
If you notice slow spots or frequent disconnections, it’s a sign to investigate further. Could interference from other devices be the culprit? Maybe a node needs repositioning.
Expand Network When Needed
As your needs grow, so should your mesh network. Adding new nodes can eliminate dead zones and handle more devices smoothly.
Think about your current device load and future plans. Are you adding smart home devices or hosting more users? Expanding at the right time avoids network congestion and keeps your connection strong.
Credit: kb.pineapple.net.au
Frequently Asked Questions
How Do I Add A New Node To My Mesh Wifi?
To add a node, plug it in near your main router. Use the mesh app to detect and sync the new node. Follow on-screen prompts to complete setup quickly and extend your WiFi coverage.
Can I Add Multiple Nodes To One Mesh Wifi System?
Yes, most mesh systems support multiple nodes. Adding more nodes improves coverage and eliminates dead zones. Always check your system’s maximum node limit before expanding.
What Is The Best Location To Place A New Mesh Node?
Place the new node halfway between the main router and dead zone. Avoid thick walls and metal objects. Proper placement ensures strong signal strength and seamless connectivity.
Will Adding A Node Slow Down My Mesh Wifi Speed?
Adding a node usually improves coverage without slowing speed. However, poor placement or outdated hardware can cause speed drops. Ensure nodes use the latest firmware and are positioned optimally.
Conclusion
Adding a node to your mesh WiFi improves your home’s internet coverage. It helps remove dead spots and keeps your connection strong. Follow the simple steps to connect the new node correctly. Check the app or device settings to ensure smooth setup.
With a better WiFi mesh, you enjoy faster speeds and fewer interruptions. Keep your network updated and secure for the best results. A strong WiFi system makes streaming, gaming, and browsing much easier. Try it today and feel the difference in your home internet.