Are you struggling to set up your portable router’s IP address? Getting this right is key to unlocking smooth internet connections wherever you go.
Imagine having full control over your network settings, boosting your speed, and keeping your connection secure. In this guide, you’ll learn simple, step-by-step instructions to configure your portable router IP quickly and easily. Stick with me, and by the end, you’ll have the confidence to manage your portable router like a pro.
Ready to take control? Let’s dive in!
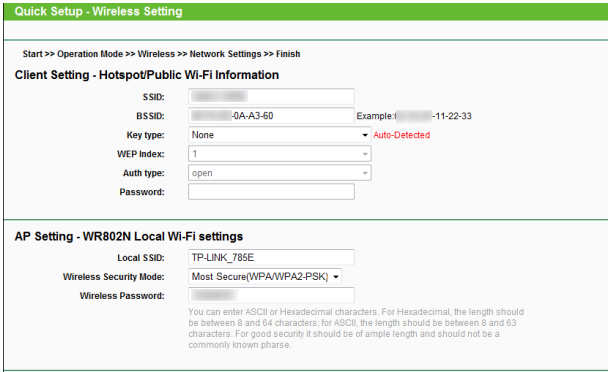
Credit: www.tp-link.com
Choosing The Right Portable Router
Choosing the right portable router is key to a smooth internet experience on the go. The right device ensures fast connection, good battery life, and easy setup. Not every router fits every need. Consider your usual travel style, number of devices, and internet speed demands before deciding.
Key Features To Consider
- Battery Life:A long-lasting battery keeps you connected longer.
- Network Compatibility:Supports 4G, 5G, or Wi-Fi standards for fast internet.
- Size and Weight:Small and light models are easier to carry.
- Security:Strong encryption protects your data from hackers.
- Number of Connections:Check how many devices can connect simultaneously.
- User Interface:Simple setup and easy-to-use controls save time.
- Price:Choose a model that fits your budget without compromising essentials.
Popular Portable Router Models
| Model | Battery Life | Network Type | Max Connections | Price Range |
|---|---|---|---|---|
| TP-Link M7350 | 10 hours | 4G LTE | 10 devices | $$ |
| Netgear Nighthawk M1 | 24 hours | 4G LTE | 20 devices | $$$ |
| Huawei E5577 | 12 hours | 4G LTE | 10 devices | $ |
| Gl.iNet GL-AR750S | 8 hours | Wi-Fi | 10 devices | $$ |
Accessing The Router Settings
Accessing the router settings is the first step to configure your portable router IP. This process allows you to change network settings and manage your internet connection effectively. You need to connect to the router network and find the default IP address to access the router’s control panel.
Connecting To The Router Network
Start by turning on your portable router. Next, connect your device to the router’s Wi-Fi network. Check your device’s available Wi-Fi list and select the router’s network name (SSID). If the network is secured, enter the password found on the router label or manual. Once connected, your device can communicate with the router for configuration.
Finding The Default Ip Address
The default IP address is essential to access the router settings page. It usually looks like 192.168.0.1 or 192.168.1.1. You can find this address printed on the router’s label or in the user guide. Alternatively, check your device’s network details:
- On Windows, open Command Prompt and type
ipconfig. Look for the “Default Gateway” under your network connection. - On Mac, open Terminal and type
netstat -nr | grep defaultto find the router IP.
Enter this IP address into your web browser’s address bar. This opens the router login page to access settings.
Changing The Router Ip Address
Changing the router IP address helps improve network management and security. It allows you to avoid conflicts and customize your network settings. This process is simple and takes only a few minutes. Follow the steps carefully to update your portable router’s IP address.
Navigating The Router Interface
Start by connecting your device to the router’s network. Open a web browser and enter the router’s default IP address in the address bar. Common addresses include 192.168.0.1 or 192.168.1.1. Press Enter to access the login page.
Enter your username and password to log in. These details are often found on the router’s label or manual. After logging in, look for the “Network Settings” or “LAN Setup” section. This area controls the router’s IP address and related settings.
Setting A New Ip Address
Find the field labeled “Router IP Address” or similar. Clear the current IP and enter your new desired IP address. Choose an address within the same subnet to keep the network stable. For example, change from 192.168.1.1 to 192.168.1.10.
Double-check the new address to avoid conflicts with other devices. Save or apply the changes to update the router’s IP. The router may reboot automatically to apply the new settings. Reconnect your device using the updated IP to continue managing your network.

Credit: www.youtube.com
Configuring Network Settings
Access your portable router’s settings through a web browser using its default IP address. Change the IP address in the network settings to avoid conflicts and improve connectivity. Save the changes and restart the router for the new IP to take effect.
Configuring Network Settings is a crucial step in ensuring your portable router functions efficiently and securely. It might seem daunting at first, especially if you’re not a tech whiz, but it’s simpler than you think. With a few clicks, you can manage DHCP settings, assign static IPs, and enhance your network’s performance.Setting Up Dhcp
Dynamic Host Configuration Protocol (DHCP) is a network management protocol that automatically assigns IP addresses to devices on your network. It’s like having a personal assistant that ensures every device gets its unique address without conflicts. First, access your router’s settings through a web browser. Enter the router’s IP address, usually something like 192.168.0.1. Look for a DHCP settings section in the menu. Here, you can enable or disable DHCP and set the range of IP addresses it can assign. It’s generally a good idea to enable DHCP, especially if you have several devices connecting and disconnecting frequently. This saves you the hassle of manually assigning IPs and minimizes errors.Assigning Static Ips
While DHCP is convenient, there are situations where you might want to assign static IPs to certain devices. Static IPs are fixed and don’t change, making them ideal for devices like printers or a NAS (Network Attached Storage) that need to be reliably reachable. To assign a static IP, find the device’s MAC address in the router settings. You can typically find this in the connected devices or DHCP client list. Once you have the MAC address, navigate to the Static IP section. Enter the MAC address and the IP you wish to assign. Make sure the static IP is outside the DHCP range to avoid conflicts. Ask yourself, which devices in your network need a constant, unchanging IP? Assigning static IPs to these devices can streamline your network management and improve performance. Configuring network settings might seem like a small part of setting up a portable router, but it significantly impacts your user experience. By understanding and adjusting DHCP and static IP settings, you can create a more reliable and efficient network.Securing Your Portable Router
Securing your portable router is essential to protect your data and privacy. An unsecured router can allow unauthorized users to access your network. This can lead to data theft or slow internet speeds. Simple security steps help keep your connection safe and reliable.
Changing Default Passwords
Default passwords are easy targets for hackers. Change the router’s admin password immediately after setup. Use a strong password with letters, numbers, and symbols. Avoid common words or simple sequences. This stops outsiders from accessing your router settings.
- Log into the router’s control panel using its IP address.
- Find the password or security settings section.
- Enter a new, strong password.
- Save the changes and log out.
Enabling Encryption
Encryption scrambles data sent over your network. It prevents outsiders from reading your information. Choose WPA3 encryption if your router supports it. If not, use WPA2 as a safe alternative. Avoid older options like WEP, which are weak.
- Access your router settings through the admin panel.
- Locate the wireless security or encryption section.
- Select WPA3 or WPA2 encryption from the options.
- Set a strong Wi-Fi password to secure the network.
- Save settings and restart the router if needed.
Troubleshooting Common Issues
Running into issues while configuring your portable router IP can be frustrating, but most problems have straightforward solutions. Understanding how to troubleshoot common issues will save you time and keep your connection stable. Let’s look at practical ways to tackle the usual hurdles you might face.
Resetting The Router
Resetting your router is often the quickest fix when settings go awry. Press and hold the reset button, usually found on the back, for about 10 seconds until the lights blink. This restores the router to factory settings, wiping out any incorrect IP configurations.
Keep in mind that resetting means you’ll lose any custom settings, so note down important information beforehand. If you’ve tried changing the IP but it won’t stick, a reset can clear hidden glitches causing the issue.
Fixing Connection Problems
If your device doesn’t connect after setting the IP, check that the IP address is in the correct range. For example, if your router’s default IP is 192.168.1.1, your device’s IP should be something like 192.168.1.x, where x is between 2 and 254.
Also, verify that the subnet mask matches the router’s settings. A common subnet mask is 255.255.255.0. Mismatched subnet masks can block communication between your device and the router.
- Restart both the router and your device.
- Disable any VPN or firewall temporarily to rule out interference.
- Check if DHCP is enabled or if you need to assign static IPs manually.
Have you ever overlooked a simple step like the subnet mask? Small details like these often cause the biggest headaches.
Optimizing Router Performance
Optimizing your portable router’s performance ensures faster speeds and stronger connections. Small changes can improve network stability and coverage. Focus on key areas for better results.
Firmware Updates
Keep your router’s firmware up to date. Firmware updates fix bugs and improve security. They also add new features that enhance performance. Check the manufacturer’s website regularly for updates. Installing updates is usually simple through the router’s settings page.
Placement Tips For Better Signal
Place your router in a central location free from obstructions. Avoid walls, metal objects, and electronic devices that cause interference. Elevate the router to a higher position like a shelf. Keep it away from microwaves and cordless phones. These steps help spread the Wi-Fi signal evenly around your space.
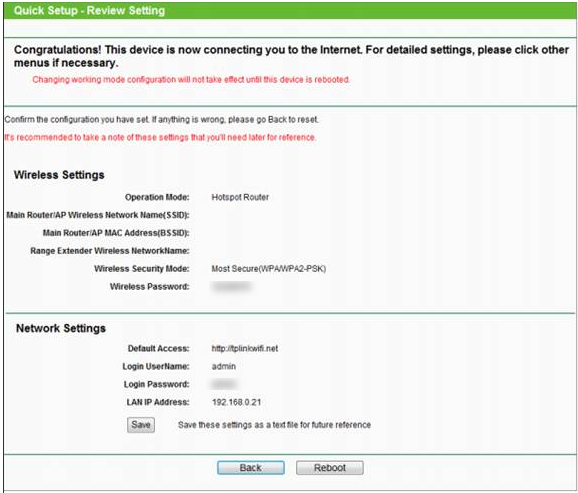
Credit: www.tp-link.com
Frequently Asked Questions
What Is A Portable Router Ip Address?
A portable router IP address is a unique identifier assigned to your router. It allows you to access and configure settings through a web browser. Typically, it is a local IP like 192. 168. 1. 1 or 192. 168. 0.
1, essential for network management.
How Do I Find My Portable Router’s Ip Address?
You can find your router’s IP address by checking the device label or user manual. Alternatively, use your computer’s command prompt or network settings to locate the default gateway IP. This IP is necessary to access your router’s admin panel.
Why Configure The Ip Address On A Portable Router?
Configuring the IP helps avoid network conflicts and ensures smooth connectivity. It allows better control of your network, such as setting static IPs for devices. Proper IP settings improve network stability and security for portable routers.
Can I Change The Portable Router’s Default Ip Address?
Yes, you can change the default IP address via the router’s admin interface. This helps enhance security and avoids IP conflicts with other devices. Always save changes and reboot the router to apply the new IP settings.
Conclusion
Configuring your portable router IP is simple and quick. Follow the steps carefully to avoid errors. Set a strong password to keep your network safe. Check your device’s manual for specific details. Change settings only when you understand their function.
Testing the connection ensures everything works well. Stay patient and take your time during setup. This helps maintain a stable internet connection. You can enjoy wireless access anywhere with ease. Keep your router updated to improve security and speed.