Want to keep your main Wi-Fi safe while still giving guests easy internet access? Setting up a guest network on your tri band router is the perfect solution.
It lets you share your connection without risking your personal data or slowing down your main network. If you’ve never done this before, don’t worry — you’re about to learn simple, step-by-step instructions that anyone can follow. By the end of this article, you’ll have a secure guest network ready in no time.
Let’s get started!

Credit: www.youtube.com
Benefits Of A Guest Network
Setting up a guest network on a tri band router offers several key benefits. It helps keep your main network safe and running smoothly. Guests can connect easily without affecting your devices. A guest network also lets you control access and manage internet speed better.
Enhanced Security
A guest network keeps visitors separate from your main network. This separation stops unauthorized access to your personal files and devices. It reduces the risk of malware spreading from guest devices. Your main network stays protected even if a guest’s device is infected.
Improved Bandwidth Management
Guest networks allow you to limit bandwidth for visitors. This control prevents guests from using too much internet speed. Your main devices get priority, ensuring smooth streaming and gaming. Managing bandwidth helps avoid slowdowns during busy times.
Simplified Access For Guests
Guests get easy, password-protected access without sharing your main Wi-Fi details. You can set up separate login credentials for visitors. This approach avoids confusion and keeps your main password private. It also lets you turn off guest access quickly when needed.

Credit: www.asus.com
Preparing Your Tri Band Router
Preparing your tri band router is essential before setting up a guest network. This step ensures your device runs smoothly and the guest network functions without interruptions. Taking a few minutes to get your router ready can save you hours of troubleshooting later.
Accessing The Router Interface
To configure your guest network, you first need to access the router’s interface. Open a web browser and enter your router’s IP address—commonly 192.168.1.1 or 192.168.0.1—in the address bar.
You’ll be prompted to log in. Use the default credentials found on your router’s label or the manual, unless you’ve changed them before. If you can’t log in, check if your device is connected to the router’s Wi-Fi or via Ethernet.
Updating Firmware
Firmware updates fix bugs and improve security. Before configuring the guest network, check if your tri band router has the latest firmware version. Look for an update option inside the router interface, usually under “Administration” or “System.”
Applying updates might require a reboot, so save your work before proceeding. Have you ever skipped updates only to find your connection unstable? Staying current avoids such headaches.
Identifying Network Bands
Tri band routers typically offer one 2.4 GHz band and two 5 GHz bands. Knowing which band serves which devices helps you optimize your guest network’s performance. Some routers let you name these bands differently to make identification easier.
Consider which band your guests will likely use. For example, 2.4 GHz covers a wider area but is slower, while 5 GHz offers faster speeds but less range. Deciding this upfront makes your guest network more reliable.
Setting Up The Guest Network
Setting up a guest network on your tri-band router offers a smart way to keep your main network secure while providing internet access to visitors. It creates a separate space for guests, preventing them from accessing your private files or connected devices. Let’s walk through the key steps to make this happen smoothly.
Creating A New Ssid
The first step is to create a new SSID (network name) specifically for your guests. This helps keep their devices separate from your main network.
Access your router’s admin panel, usually by typing the router’s IP address into a browser. Look for the “Guest Network” section and choose to add a new SSID. Pick a clear, easy-to-identify name like “HomeGuest” or “GuestWiFi.”
Keep it simple but distinct so guests know which network to connect to. Avoid using your primary network’s name to reduce confusion.
Configuring Password And Security
Securing your guest network is crucial. Even though it’s separate, you want to prevent unauthorized users from jumping in.
Set a strong password using a mix of letters, numbers, and symbols. This is your first line of defense. Choose WPA3 security if your router supports it; otherwise, WPA2 is the next best option.
Remember, an open network might seem convenient, but it exposes you to risks. Ask yourself: Would you want strangers accessing your internet without any control?
Assigning Band Preferences
Tri-band routers offer multiple frequency bands—usually one 2.4 GHz and two 5 GHz bands. Assigning the right band to your guest network can improve performance for everyone.
If your guests mostly browse casually, the 2.4 GHz band is sufficient and offers better range. For higher speeds, assign the guest SSID to one of the 5 GHz bands, which supports faster connections but shorter range.
Some routers allow you to specify which band the guest network uses. Experiment with these settings based on your home layout and typical guest needs.
Customizing Guest Network Settings
Customizing your guest network settings helps control access and improve security. A tri-band router offers extra flexibility for managing guest users. Adjusting settings allows you to balance speed and privacy for visitors.
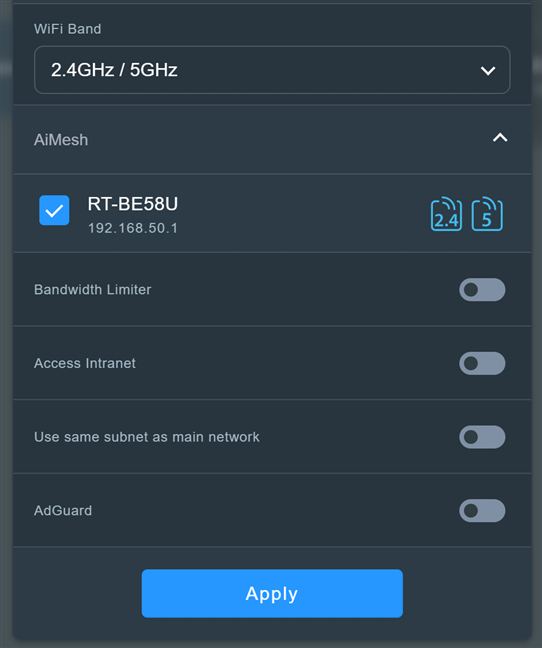
These settings protect your main network while giving guests reliable internet. You can limit bandwidth, isolate the guest network, and schedule when it is active. Each option fits different needs and keeps your network running smoothly.
Setting Bandwidth Limits
Bandwidth limits control how much internet speed guests can use. This prevents them from slowing down your main network. You can set limits in your router’s admin panel under guest network settings.
- Choose a maximum download and upload speed for guests.
- Set limits based on time or device if your router allows.
- Monitor usage to adjust limits as needed for better performance.
Enabling Network Isolation
Network isolation stops guest devices from accessing your private network. It keeps your files and devices safe from guests. Turn on this feature in the guest network options of your router.
- Prevents guests from seeing or interacting with main devices.
- Allows internet access only for guest devices.
- Improves security by separating guest and home networks.
Scheduling Network Availability
Scheduling turns the guest network on or off at set times. This controls when guests can use the internet. Use your router’s scheduling feature to set specific hours or days for access.
- Set guest network to turn off during night or work hours.
- Save energy and reduce unwanted usage.
- Keep control over guest access without manual intervention.
Testing And Troubleshooting
Test the guest network by connecting a device to ensure proper access and speed. Troubleshoot issues by checking router settings and restarting the device if needed. Verify the guest network isolation to keep your main network secure.
Configuring a guest network on a tri-band router can enhance security. To ensure everything runs smoothly, testing and troubleshooting are essential. You need to confirm that devices connect properly and have internet access. Also, be ready to address any common issues that might arise.Connecting Devices To Guest Network
First, ensure devices can connect to the guest network. Use a smartphone, tablet, or laptop. Go to the Wi-Fi settings and select the guest network. Enter the password if prompted. Ensure the connection is stable. If the device fails to connect, check the router settings. Make sure the guest network is enabled and broadcasting.Verifying Internet Access
Once connected, check if the device can access the internet. Open a web browser and visit a website. If the page loads, internet access is working. If not, check the router’s internet connection. Ensure no parental controls are blocking access.Resolving Common Issues
Some devices may face connection issues. Restart the device and try connecting again. If problems persist, restart the router. Check for firmware updates to improve performance. Ensure the guest network password is correct. If you face slow speeds, check if too many devices are connected. Reducing the number may help.Best Practices For Guest Networks
Setting up a guest network on a tri band router is only the first step. Following best practices keeps this network safe and efficient. These practices protect your main network and provide a smooth experience for guests. Focus on simple, regular actions that maintain security and performance.
Regularly Updating Passwords
Change guest network passwords often. This stops unauthorized users from accessing your network. Use passwords that are easy to share but hard to guess. Avoid using default or simple passwords. Updating passwords regularly keeps your network safer.
Monitoring Network Usage
Keep an eye on how the guest network is used. Check which devices connect and how much data they use. Look for unusual activity that might signal a security issue. Monitoring helps you spot problems early and control bandwidth use.
Keeping Firmware Up To Date
Update your router’s firmware regularly. Firmware updates fix bugs and improve security. They also add new features and boost performance. Always download updates from the official router website or app to stay protected.
Credit: www.digitalcitizen.life
Frequently Asked Questions
What Is A Guest Network On A Tri Band Router?
A guest network is a separate Wi-Fi access for visitors. It keeps your main network secure and limits access to your devices. Tri band routers support multiple networks, improving speed and connection stability for guests.
How Do I Enable Guest Network On A Tri Band Router?
Access your router’s admin panel via a web browser. Locate the guest network settings under Wi-Fi or wireless options. Enable the guest network, set a name (SSID), and create a secure password. Save changes to activate the network.
Can I Limit Guest Network Access On Tri Band Routers?
Yes, you can restrict guest network access. Options include bandwidth limits, device limits, and time restrictions. This keeps your main network safe and manages guest usage effectively. Check your router’s settings for these controls.
Does Guest Network Affect Tri Band Router Performance?
A guest network uses one of the router’s bands but minimally affects performance. Tri band routers have three separate bands, ensuring main network speed stays stable. Proper setup prevents interference and maintains overall network quality.
Conclusion
Setting up a guest network on your tri band router is simple and useful. It keeps your main network safe and lets guests connect easily. Just follow the steps carefully, and you will have a separate network in no time.
This way, your devices stay protected while guests enjoy internet access. Regularly update your router’s settings to keep security strong. A guest network is a smart choice for any home or office. Try it today and see the difference it makes.