Are you looking to boost your online privacy and security right from your home network? Adding a VPN to your tri-band router can be a game-changer.
It not only protects every device connected to your Wi-Fi but also helps you access content without restrictions. If you’ve ever wondered how to set this up without technical headaches, you’re in the right place. Keep reading, and you’ll discover simple, step-by-step guidance to get your VPN running smoothly on your tri-band router—no jargon, no confusion.
Your safer, faster internet experience starts here.
Benefits Of Using A Vpn With Tri Band Routers
Using a VPN with a tri band router offers many advantages. It improves your online experience by keeping your data safe and private. A VPN also helps you access content that might be blocked in your region. Combining a VPN with a tri band router enhances security and performance for all your devices connected to the network.
Enhanced Online Privacy
A VPN hides your IP address from websites and trackers. It stops others from seeing your browsing habits. Your internet activity stays private from hackers, advertisers, and even your internet provider. This protection is important for all online tasks, from shopping to banking.
Secure Data Transmission
VPNs encrypt your data, making it unreadable to outsiders. This encryption protects sensitive information like passwords and credit card numbers. Using a tri band router with VPN ensures every device on your network shares this secure connection. It guards your home network against cyber threats.
Bypass Geographic Restrictions
Many websites and streaming services block content based on location. A VPN lets you connect through servers in different countries. This connection helps you access shows, games, and websites unavailable in your area. Tri band routers handle multiple devices smoothly, so everyone in the home can enjoy unrestricted content.
Choosing The Right Vpn For Your Router
Choosing the right VPN for your tri band router ensures a smooth and safe internet experience. The VPN must work well with your router’s technology. It should keep your speeds fast and protect your data. Picking the correct VPN can improve your online privacy without slowing down your connection.
Compatibility With Tri Band Routers
Your VPN must support tri band routers to work properly. Not all VPNs offer router installation guides or apps. Check if the VPN provides firmware or setup instructions for your specific router model. Some VPNs work only with certain brands or firmware types like DD-WRT or Tomato. Confirm compatibility to avoid connection issues.
Speed And Performance
Fast speeds keep streaming, gaming, and browsing smooth. A good VPN should have many servers near your location. This reduces lag and buffering. Look for VPNs with unlimited bandwidth and no speed caps. A VPN with optimized servers for routers will deliver better performance on tri band devices.
Security Features To Look For
Strong security protects your data from hackers and spies. Choose a VPN with AES-256 encryption for top safety. A kill switch stops internet traffic if the VPN drops. DNS leak protection prevents your real location from showing. Also, check if the VPN has a strict no-logs policy for privacy.
Preparing Your Tri Band Router For Vpn Setup
Before adding a VPN to your tri band router, some preparation is essential. This ensures a smooth and secure setup process. Taking time to prepare your router helps avoid connection issues and protects your current settings.
Start by accessing the router’s admin panel. This is where you manage all settings and configurations. Next, update the firmware to the latest version. Updated firmware improves performance and security. Finally, back up your current settings. This step safeguards your configurations in case you need to restore them later.
Accessing Router Admin Panel
Connect your device to the router’s network. Open a web browser and enter the router’s IP address. Common addresses include 192.168.1.1 or 192.168.0.1. Log in using the router’s username and password. Check the router manual for default credentials if unknown. Once logged in, you can access all router controls.
Updating Firmware
Find the firmware update section in the admin panel. It is often located under “System” or “Administration.” Download the latest firmware from the router manufacturer’s website. Upload the firmware file through the update page. Avoid turning off the router during the update. Wait until the process finishes to prevent damage.
Backing Up Current Settings
Locate the backup or save settings option in the admin panel. Export your current configuration file to your device. Store this file safely for future use. This backup allows you to restore settings if the VPN setup causes issues. It also saves time if you need to reset the router.
Credit: www.techrepublic.com
Step-by-step Vpn Installation On Tri Band Router
Adding a VPN to your tri-band router can enhance your online privacy, ensuring that all devices connected to your network are secure. But if you’re not tech-savvy, the process might seem daunting. Fear not, as this guide breaks down the steps to make it straightforward and manageable. By following these steps, you’ll have your VPN up and running in no time, making your home network more secure and private.
Downloading Vpn Configuration Files
First, you’ll need to download the VPN configuration files from your VPN provider. These files are crucial as they contain the settings required for the VPN to work on your router.
Most VPN providers offer these files in your account dashboard. Log in to your account, navigate to the downloads section, and locate the configuration files specific to your router model.
Save these files to a location on your computer where you can easily find them, such as your desktop. This will make it simpler when you need to upload them later.
Configuring Vpn Client On Router
Next, access your router’s admin panel. This is usually done by typing the router’s IP address into your web browser’s address bar. The default IP is often something like 192.168.1.1, but check your router’s documentation if you’re unsure.
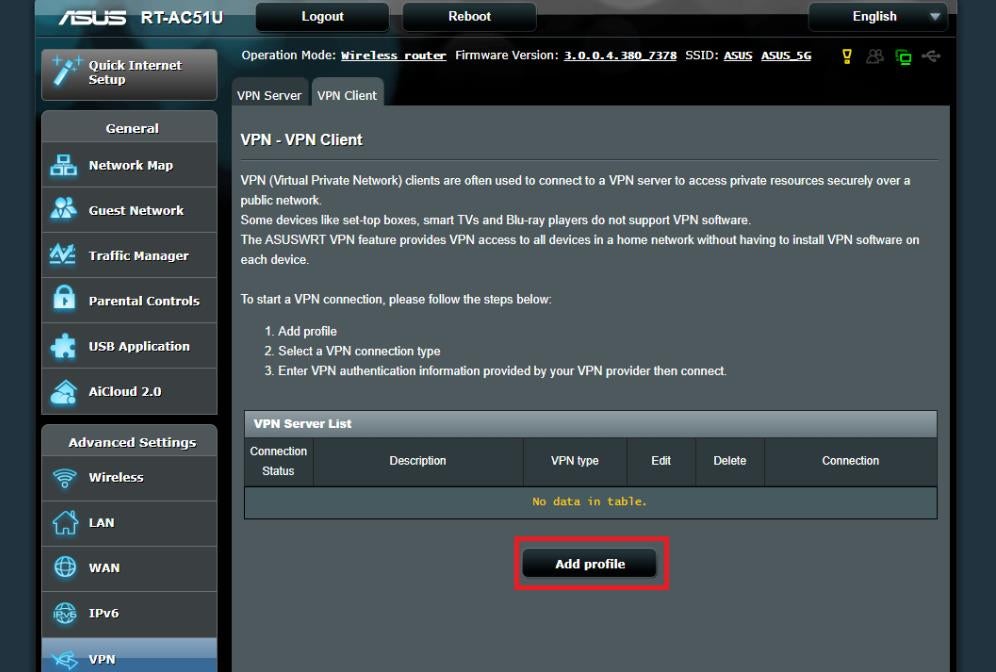
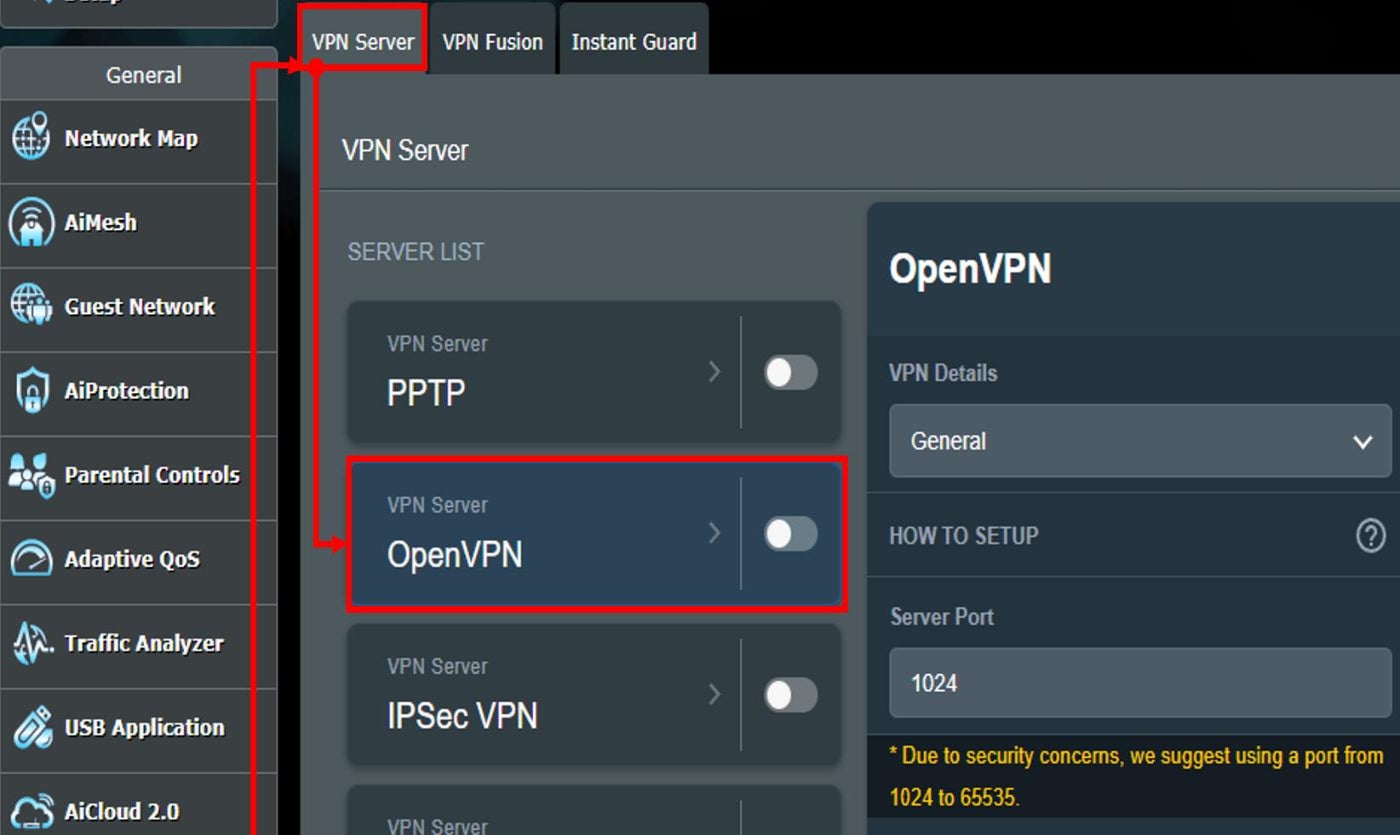
Once logged in, locate the VPN section within the settings menu. Depending on your router’s interface, this might be under ‘Advanced Settings’ or a similar category.
Here, you’ll upload the configuration files you downloaded earlier. Most routers will have an option to ‘Upload’ or ‘Import’ these files. Follow the on-screen prompts to complete this process.
Saving And Applying Settings
After uploading the configuration files, you’ll need to save and apply these new settings. Look for a ‘Save’ or ‘Apply’ button, often found at the bottom of the settings page.
Once you save the settings, your router will likely restart. This is normal and necessary for the changes to take effect. Allow a few minutes for this process to complete.
Finally, check your connection to ensure the VPN is working. You can do this by visiting a website that displays your IP address and verifying that it reflects the location of your VPN server, not your actual location.
By following these steps, you can ensure that your entire home network is protected by a VPN, enhancing your online privacy and security. Have you considered how much safer your online activities will be with this added layer of protection?
Testing And Troubleshooting Vpn Connection
Testing and troubleshooting your VPN connection on a tri-band router ensures your network stays secure and performs well. Without proper checks, you might face slow speeds or dropped connections that can disrupt your online activities. This section helps you verify your VPN’s status, identify common issues, and improve performance effectively.
Verifying Vpn Status
Start by confirming that your VPN is actively connected to your tri-band router. Access your router’s admin panel and navigate to the VPN section to check the connection status.
- Look for indicators such as “Connected,” “Active,” or “Running.”
- Verify the assigned IP address matches the VPN server location you selected.
- Run an IP leak test on a website like ipleak.netto ensure your real IP is masked.
If your VPN shows as connected but the IP leak test reveals your original IP, your router might not be routing traffic through the VPN correctly.
Common Issues And Fixes
VPN connections on tri-band routers can face specific problems that often have simple solutions.
- Connection drops:Restart your router and VPN service. Check for firmware updates that fix stability bugs.
- Slow internet speeds:Switch to a less congested VPN server or try different VPN protocols like OpenVPN or WireGuard.
- VPN not connecting:Double-check your login credentials and VPN settings in the router interface.
- Incompatibility with devices:Assign VPN to specific bands or devices if your router supports split tunneling.
Have you ever spent hours troubleshooting only to find a simple firmware update fixed everything? Keeping your router updated saves time and frustration.
Optimizing Vpn Performance
Speed and reliability matter when using VPNs on tri-band routers. Here’s how to get the most out of your setup.
- Connect devices that require the VPN to the specific band configured for VPN to reduce interference.
- Limit the number of devices using the VPN simultaneously to avoid bandwidth bottlenecks.
- Choose VPN servers geographically closer to you for faster response times.
- Adjust encryption levels if your VPN service allows it; lighter encryption can boost speed but lowers security.
Ask yourself: Is your VPN setup prioritizing security at the cost of speed, or are you balancing both effectively?

Credit: www.youtube.com
Maintaining Vpn Security On Your Router
Maintaining VPN security on your tri-band router is essential for safe and private internet use. A VPN protects your data from hackers and snoopers. Keeping this protection strong requires regular care and attention. Simple steps help secure your router and keep your online activities private.
Regular Firmware And Vpn Updates
Router firmware updates fix security problems and improve performance. VPN software updates add new features and close security gaps. Check for updates often and install them quickly. Many routers allow automatic updates, which saves time and keeps security tight.
Monitoring Network Activity
Watching your network helps spot unusual actions. Use your router’s dashboard to see connected devices and traffic patterns. Look for unknown devices or spikes in data use. Detecting strange activity early can stop threats before damage occurs. Some routers offer alerts for suspicious behavior. Turn these on for better protection.
Changing Vpn Servers Periodically
Switching VPN servers regularly reduces tracking risks. VPN providers have many servers worldwide. Changing servers helps keep your IP address fresh and private. It also avoids potential slowdowns from overcrowded servers. Make it a habit to pick a new server every few days or weeks. This simple step strengthens your online anonymity.
Credit: www.techrepublic.com
Frequently Asked Questions
How Do I Set Up A Vpn On A Tri-band Router?
To set up a VPN, access your router’s admin panel. Enter VPN credentials under the VPN section. Save and activate the VPN. This secures all connected devices through the router.
Can All Tri-band Routers Support Vpn Connections?
Not all tri-band routers support VPNs. Check your router’s specifications or firmware. VPN-compatible routers offer built-in VPN client features. Otherwise, custom firmware might be required.
What Vpn Protocol Is Best For Tri-band Routers?
OpenVPN is widely recommended for tri-band routers. It offers strong security and good speed. Other options include PPTP and L2TP, but they are less secure.
Will Adding A Vpn Slow My Tri-band Router?
Using a VPN may slightly reduce internet speed. Encryption and routing add overhead. However, tri-band routers usually handle VPNs efficiently without major speed loss.
Conclusion
Adding a VPN to your tri-band router keeps your network safe and private. The steps are simple and clear. Your internet traffic stays encrypted and secure. You control which devices use the VPN. This helps protect your data from hackers.
Enjoy faster connections without losing security. Take time to follow each step carefully. Soon, your online experience will feel safer and smoother. A VPN on your tri-band router is a smart choice for any home or office.