Imagine you’re parked in a serene campsite, surrounded by nature, yet still longing for a strong and reliable internet connection to stream movies, catch up on emails, or simply surf the web. You know how frustrating it can be when your RV’s WiFi connection is spotty or weak.
The solution? An outdoor WiFi extender. But how do you connect it to your RV to ensure that seamless connectivity you crave? In this guide, we’ll unravel the simple steps to help you connect an outdoor WiFi extender to your RV, turning your mobile home into a connectivity hub.
You’ll discover how easy it is to boost your signal strength and enjoy a hassle-free internet experience, no matter where your travels take you. Read on to unlock the secrets of staying connected on the road.
Choosing The Right Outdoor Wifi Extender
Choose an outdoor WiFi extender with strong weatherproof features. It should resist rain, wind, and dust. Durability is key for long trips and outdoor use. Check if the extender has an IP65 or higher ratingfor protection.
Compatibility with your RV system is important. The extender must connect easily to your RV’s WiFi or cellular setup. Look for models that support multiple connection typeslike Ethernet and WiFi.
- Weatherproof casing:Protects from harsh weather
- Durable materials:Withstands travel bumps
- Easy installation:Fits RV setup smoothly
- Multiple connection options:Ethernet, WiFi, or cellular
- Signal range:Covers wide outdoor areas

Credit: www.amazon.com
Preparing Your Rv For Installation
Choose a mounting location on your RV that gets good signalfrom the outdoor WiFi source. The spot should be high and clear, free from obstructions like trees or metal surfaces. This helps the extender catch and boostthe signal better.
Gather tools such as a drill, screwdriver, mounting brackets, and the extender kit. Have cables and power sourcesready for easy installation. Make sure to check the extender’s manual for any special tools.
Follow safety rules strictly. Wear protective gloves and glasses. Avoid working in wet or windy conditions to prevent accidents. Secure your ladder well and do not rush the process. Safety first keeps the job easy and smooth.
Step-by-step Installation Process
Choose a high spot outside your RV to mount the extender. It should be clear of large metal objects or trees. Use the mounting bracket and screws to fix the extender firmly. Make sure it points toward the WiFi source for better signal strength.
Connect the extender to a power source. Use an outdoor-rated power outlet if available. If not, a power inverter inside the RV can work. Ensure all cables are weatherproof and secured to avoid damage from wind or rain.
Access the extender’s setup page using a smartphone or laptop. Connect to the extender’s default WiFi network. Enter the extender’s IP address in your browser. Follow the on-screen instructions to select your RV park’s WiFi network and enter the password. Save settings and wait for the extender to connect.
Optimizing Signal Strength
Adjusting the extender positionis key to better signal strength. Place the extender where it can catch a clear WiFi signal from the source. Avoid walls, metal objects, and large obstacles that can block or weaken the signal. Moving the extender higher can also help it get a stronger signal.
Using signal boosters or antennascan make a big difference. Some extenders allow adding external antennas to improve reception. Signal boosters help increase the WiFi range, especially in open outdoor spaces or near the RV.
- Avoid common interference issueslike microwaves, cordless phones, and other wireless devices.
- Keep the extender away from thick walls and metal surfaces.
- Try changing WiFi channels to reduce signal overlap with neighbors.
Testing And Troubleshooting
Check the WiFi signal strengthon your device to ensure a stable connection. Move closer to the extender if the signal is weak. Test the connection by loading simple websites or streaming low-quality videos.
Common issues include slow speeds, no connection, or frequent drops. Restart the extender and router to fix many problems. Ensure the extender is placed where it can get a good signal from the main router.
| Problem | Possible Cause | Solution |
|---|---|---|
| No Connection | Extender too far from router | Move extender closer to router |
| Slow Speed | Interference from objects | Remove obstacles or change location |
| Frequent Drops | Outdated firmware | Update extender firmware |
Keep the extender’s firmware up to date for best performance. Check the manufacturer’s website for updates. Regular maintenance includes cleaning the device and checking connections.
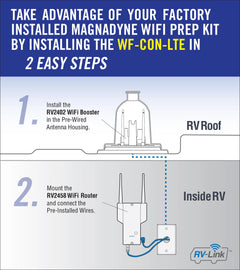
Credit: magnadyne.com
Tips For Maintaining Your Outdoor Wifi Extender
Regular cleaninghelps keep your outdoor WiFi extender working well. Dust, dirt, and spider webs can block signals. Use a soft cloth and mild soap to clean the device gently. Check for loose wires or broken parts during cleaning. A quick look can stop bigger problems later.
Protecting against weather damageis very important. Rain, sun, wind, and snow can hurt your extender. Place it under a small roof or cover to shield it from direct weather. Use weatherproof cases if available. Make sure cables are tight and sealed to stop water getting in.
Seasonal storage advicekeeps your extender safe when not in use. Take it down before heavy storms or winter. Store it in a dry, cool place. Wrap cables to stop tangles and damage. This care extends the life of your extender.

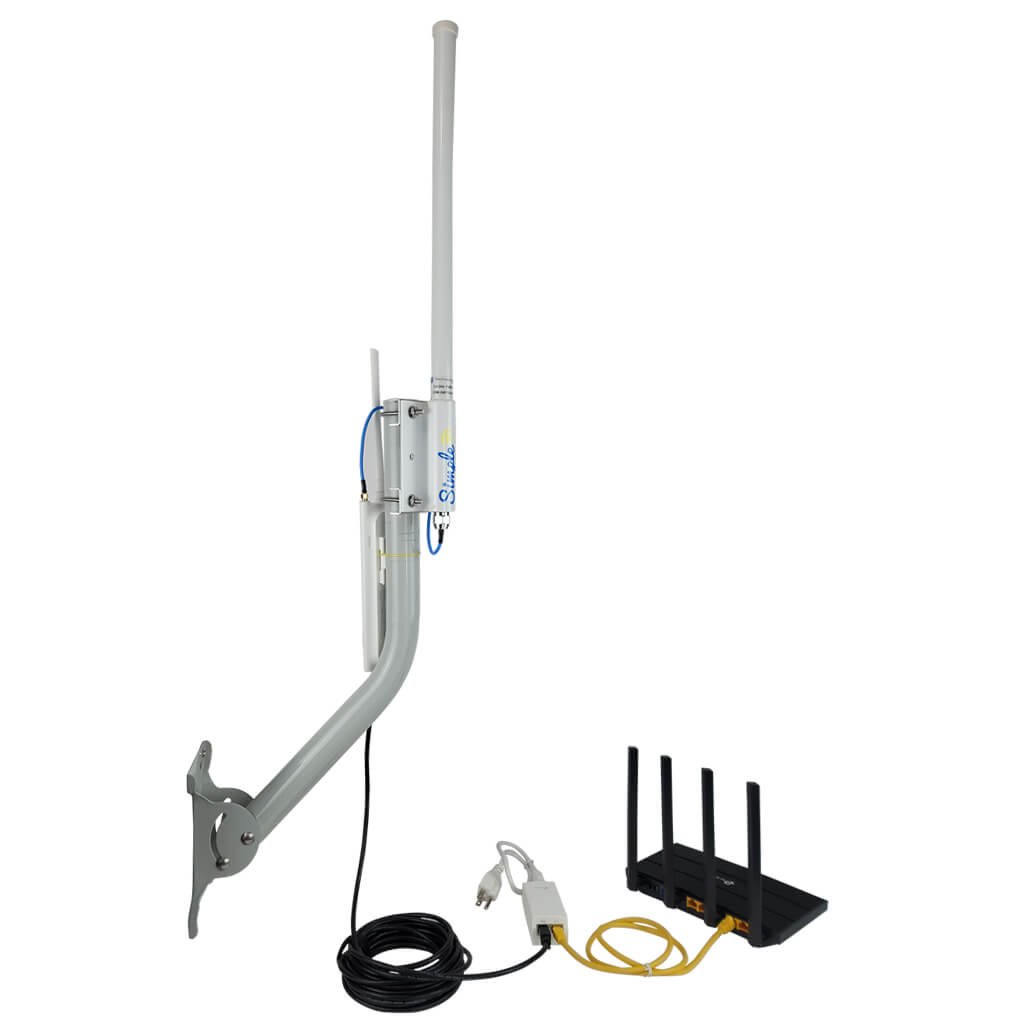
Credit: www.amazon.com
Frequently Asked Questions
How Do I Set Up An Outdoor Wifi Extender For My Rv?
Start by placing the extender where it receives a strong WiFi signal. Connect it to your RV’s network via Ethernet or WiFi. Follow the manufacturer’s instructions for configuration. Ensure the extender is weatherproof and securely mounted outdoors.
Can An Outdoor Wifi Extender Improve Rv Internet Speed?
Yes, an outdoor WiFi extender boosts signal strength and coverage. It reduces dead zones around your RV. This results in faster and more reliable internet connectivity, especially in remote or congested areas.
What’s The Best Location For An Rv Wifi Extender?
Place the extender near the RV but within the router’s signal range. Avoid obstacles like walls or metal surfaces. Mount it high and outdoors for optimal reception and transmission of the WiFi signal.
Do Outdoor Wifi Extenders Work With All Rv Routers?
Most outdoor WiFi extenders are compatible with standard RV routers. Check your extender’s specifications for compatibility. Ensure your RV router supports the extender’s frequency bands (2. 4GHz or 5GHz).
Conclusion
Connecting an outdoor WiFi extender to your RV is simple and useful. It helps you get better internet signals while traveling. Follow the steps carefully to set it up right. Check your connections and settings for a smooth experience. Enjoy faster and stronger WiFi wherever you park your RV.
Stay connected with family and friends easily. Keep your devices online without interruptions. This small device makes your RV trips more comfortable and fun.