Are you struggling to keep your devices connected smoothly on your tri-band router? Setting up a static IP address can be the key to a faster, more reliable network.
By giving your device a fixed address, you avoid connection drops and enjoy better control over your home or office Wi-Fi. In this guide, you’ll learn exactly how to add a static IP to your tri-band router step by step.
Keep reading, and you’ll soon have a stronger, more stable connection that works exactly how you want it to.
Why Use A Static Ip
Using a static IP address can significantly improve how your tri band router manages your network. Unlike dynamic IPs that change frequently, static IPs remain constant, giving your devices a fixed address on the network. This consistency can enhance connectivity, simplify device management, and improve overall network performance.
Benefits For Tri Band Routers
Tri band routers handle multiple devices across different frequency bands, and a static IP helps keep this process smooth. Assigning static IPs reduces the chance of IP conflicts that can disrupt connections. It also makes it easier to set up port forwarding, which is crucial for gaming, streaming, or running a home server.
With a static IP, you can quickly identify devices on your network, improving troubleshooting and monitoring. This is especially useful if you have smart home devices that need stable connections to function properly. It lets you control your network with more precision, ensuring each device gets the right bandwidth.
When To Choose Static Ip
If you frequently access your home network remotely or run services like a web server, static IPs are a smart choice. They eliminate the frustration of changing IP addresses that can interrupt your access or cause errors. Consider static IPs if you want reliable connections for devices like printers, security cameras, or NAS drives.
Think about whether your network needs predictability and easy management. If you notice devices dropping connections or if setting up port forwarding feels complicated, assigning static IPs can solve these issues. Static IPs offer stability when you need it most, making your tri band router work harder for you.
Credit: circuitdigest.com
Preparing For Setup
Preparing to set a static IP on your tri-band router needs careful steps. A clear plan helps avoid errors and saves time. Gathering correct details and knowing how to enter router settings are vital.
Gathering Necessary Information
Collect important data before changing IP settings. This includes:
- Router’s current IP address
- Subnet mask
- Default gateway
- Preferred static IP address
- DNS server addresses
Check your device’s network status or user manual to find these details. Write down all the info for quick reference.
Accessing Router Settings
To change IP settings, open your router’s admin page. Connect to your tri-band router’s Wi-Fi or use an Ethernet cable.
Open a web browser and enter the router’s IP address in the address bar. Common router IPs are 192.168.1.1 or 192.168.0.1.
Log in using your username and password. These are often on the router label or in the manual. If you never changed them, use default credentials.
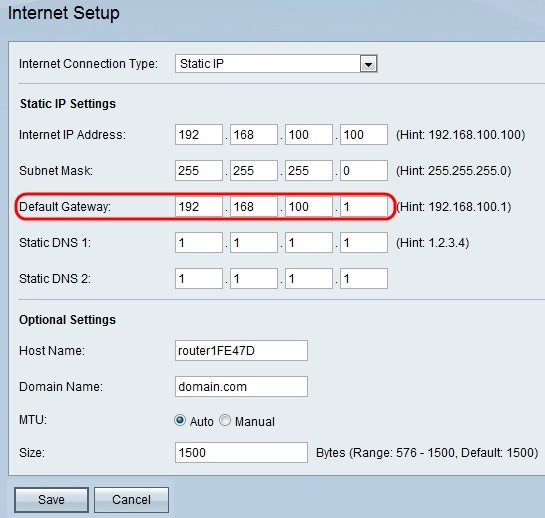
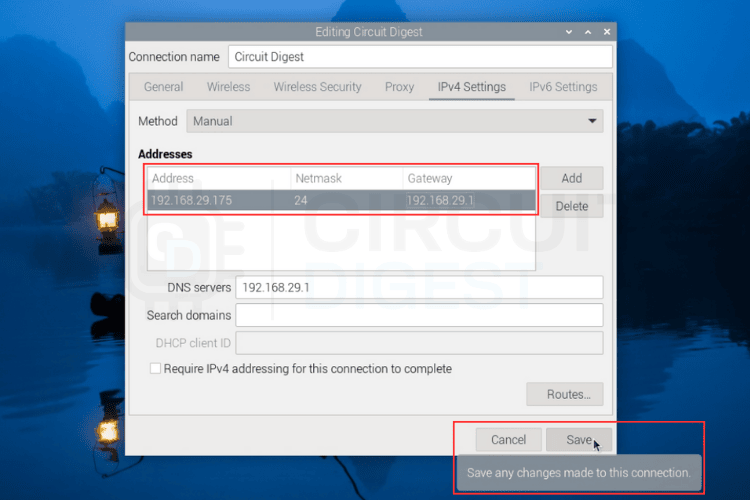
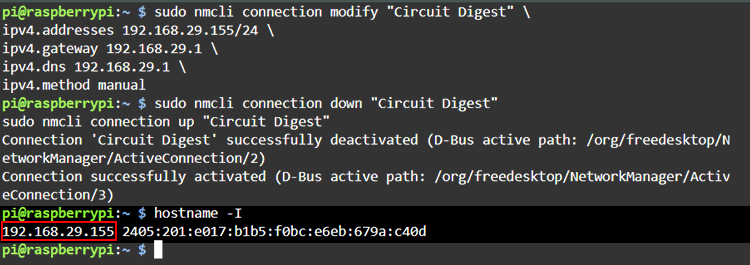
Configuring Static Ip On Tri Band Router
Configuring a static IP on a tri band router ensures a stable network connection. It helps devices keep the same IP address every time they connect. This setup reduces connection issues and improves network management. Follow these simple steps to assign a static IP address to your tri band router.
Navigating To Network Settings
First, open your web browser and enter the router’s IP address. Usually, it is 192.168.1.1 or 192.168.0.1. Log in with your username and password. Once logged in, find the section labeled “Network” or “LAN Settings.” This is where you can manage IP addresses and other network details.
Assigning The Static Ip Address
Look for an option called “Static IP” or “Manual IP Assignment.” Enter the IP address you want to assign to your device. Make sure this address is outside the DHCP range to avoid conflicts. Check that the IP address fits your network scheme. For example, use 192.168.1.x if your router uses 192.168.1.1.
Setting Subnet Mask And Gateway
Next, set the subnet mask. The common subnet mask is 255.255.255.0. This setting controls which devices are on the same network. Then, enter the default gateway. Usually, this is your router’s IP address. These settings ensure your device communicates correctly with other devices and the internet.
Saving And Applying Changes
After entering the details, save your settings. Look for a “Save” or “Apply” button on the page. The router may restart to apply the changes. Once done, your device should have the static IP address. Verify the connection by checking your device’s network details.
Credit: circuitdigest.com
Verifying The Static Ip Configuration
Check the router’s settings page to confirm the static IP address is correctly entered. Ensure the IP matches your network’s range to avoid conflicts. Verify the subnet mask and gateway are set properly for a stable connection.
Verifying the static IP configuration on your tri-band router ensures that your internet connection remains stable and reliable. After assigning a static IP, it’s crucial to confirm that everything is set up correctly. This can prevent future connectivity issues and keep your network running smoothly. Let’s dive into the steps to make sure your static IP configuration is accurate and effective.Checking Connection Status
Once you’ve set up the static IP, the first thing you need to do is check the connection status. Log into your router’s admin page and navigate to the status section. Here, you should see your assigned static IP address. If the static IP is displayed correctly, that’s a good sign. But, if it shows a different IP or none at all, you may need to revisit your settings. Double-check the IP address, subnet mask, and gateway settings to ensure they match what you intended to configure.Testing Network Stability
After verifying the connection status, it’s important to test the network stability. Start by connecting a device to the router and monitor the connection for any drops or inconsistencies. Use online tools or command prompts to ping your router’s IP address. Regular responses indicate a stable connection. If you notice delays or timeouts, consider rebooting your router or rechecking your static IP settings. Does your internet connection feel more reliable after setting a static IP? This simple change can make a significant difference in your daily online activities. Your gaming, streaming, and browsing experiences can become smoother and more enjoyable with a correctly configured static IP.Troubleshooting Common Issues
Setting a static IP on a tri-band router can sometimes cause common issues. These issues might disrupt your network or stop devices from connecting. Understanding these problems helps fix them fast. This section covers typical troubles and easy solutions.
Ip Address Conflicts
IP address conflicts happen when two devices use the same IP. This causes network confusion and connection drops. Avoid conflicts by assigning unique IPs to each device. Check your router’s DHCP range and pick static IPs outside this range. This ensures no overlap between dynamic and static IPs.
Connection Failures
Connection failures occur if the static IP is set incorrectly. Double-check the IP address, subnet mask, and gateway. These must match your network settings. Also, verify DNS server addresses are correct. Restart your device and router after changes. This refreshes network settings and often restores connection.
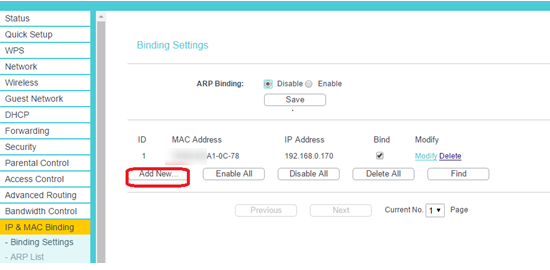
Resetting Router Settings
Resetting the router fixes many issues, including static IP problems. Use the reset button on the back of the router. Hold it for 10-15 seconds until lights blink. Remember, this clears all custom settings. You must reconfigure your router afterward, including Wi-Fi and static IP settings.
Credit: www.tp-link.com
Frequently Asked Questions
How Do I Assign A Static Ip On A Tri-band Router?
To assign a static IP, log into your router’s admin panel. Locate the LAN or DHCP settings. Enter the desired IP address and MAC address of your device. Save the changes and reboot the router to apply the static IP configuration.
Why Use A Static Ip On A Tri-band Router?
A static IP ensures your device always has the same address. This helps with network stability, port forwarding, and remote access. It improves connection reliability for gaming, streaming, and smart home devices on tri-band routers.
Can Static Ip Improve My Tri-band Router’s Performance?
Static IPs don’t directly boost speed but enhance network stability. Devices with static IPs avoid IP conflicts and disconnections. This leads to smoother connections, especially for devices needing consistent network access.
Is Setting A Static Ip Complicated On Tri-band Routers?
No, it’s straightforward. Most tri-band routers have user-friendly interfaces. Access the router settings, find DHCP reservation or static IP options, and enter your device’s details. Follow prompts to save settings easily.
Conclusion
Adding a static IP to your tri-band router is simple and helpful. It keeps your devices connected with the same address every time. This helps avoid connection issues and makes network management easier. Follow the steps carefully, and you will set it up quickly.
A stable network means less frustration and better internet use. Keep your router settings safe and check them if problems arise. This small change can improve your home or office network a lot. Try it today and enjoy smoother internet connections.