Are you struggling with slow Wi-Fi or interference from multiple bands on your tri band router? Knowing how to disable one band can make a big difference in your internet speed and device connections.
In this guide, you’ll learn simple steps to turn off a specific band on your router, so you can get a faster, more stable connection tailored to your needs. Keep reading to discover how this quick adjustment can improve your online experience right now.
Credit: helpdeskgeek.com
Tri Band Router Basics
Understanding the basics of a tri band router is essential before you decide to disable one of its bands. These routers are designed to manage multiple connections efficiently, but sometimes you might want to limit or customize which bands are active. Knowing how these routers work helps you make informed choices about your home or office network setup.
What Is A Tri Band Router
A tri band router broadcasts three separate Wi-Fi signals on different frequency bands. Usually, it offers one 2.4 GHz band and two 5 GHz bands. This setup allows more devices to connect without slowing down your network.
Think of it as having three lanes on a highway instead of one. Each lane handles traffic separately, reducing congestion. This is especially helpful if you have many gadgets like smartphones, laptops, smart TVs, and gaming consoles all at once.
Benefits Of Using Tri Band Routers
- Improved Speed:With three bands, your devices can connect to less crowded channels, which often means faster internet.
- Better Performance:Streaming, gaming, and video calls become smoother because the router can distribute traffic efficiently.
- More Device Support:You can connect more devices without causing network slowdown.
- Reduced Interference:The separate bands minimize interference from other nearby Wi-Fi networks.
Have you noticed your internet slowing down when many devices are connected? A tri band router can help fix that by spreading the load. But sometimes, disabling a band might improve stability if one frequency is causing issues.
Reasons To Disable One Band
Disabling one band on a tri-band router can help customize your network for better use. It can make your internet faster and more stable. Some users find certain bands unnecessary for their needs. Turning off one band helps focus the signal on the most important frequencies. This choice also reduces the complexity of managing multiple bands at once.
Improving Network Performance
Turning off one band can boost overall network speed. It reduces the load on the router’s processor. Your devices connect to fewer bands, which can lead to faster data transfer. This is especially true in homes with many devices. The router focuses its power on the remaining bands, improving signal quality.
Reducing Interference
Wireless signals often overlap, causing interference. Disabling one band reduces this overlap. It lowers the chance of signal disruption from other electronics. Fewer active bands mean less chance of your Wi-Fi slowing down. This creates a smoother connection for streaming and gaming.
Simplifying Network Management
Managing fewer bands makes the network simpler to control. You can easily assign devices to specific bands. It helps in monitoring which devices use the network most. Fewer bands also mean fewer settings to adjust. This simplicity benefits users who are not tech-savvy.
Accessing Router Settings
Accessing your router settings is the first key step to disabling one band on a tri-band router. Without entering the router’s interface, you won’t be able to make any changes to the wireless bands or other configurations. The process might feel technical, but it’s straightforward once you know where to look and how to log in.
Connecting To The Router Interface
Start by connecting your device to the router’s network—either through Wi-Fi or a wired Ethernet connection. This ensures your device can communicate directly with the router.
Next, open a web browser and type the router’s IP address into the address bar. Most routers use common IPs like 192.168.0.1or 192.168.1.1. If these don’t work, check your device’s network settings to find the correct gateway address.
Once you enter the IP, the router’s login screen will appear. This is your gateway to adjust settings, but only if you have the right credentials.
Finding Login Credentials
Login details are often printed on a sticker on the back or bottom of your router. Look for a username and password—usually something like admin/adminor admin/password.
If the sticker is missing or you’ve changed the credentials before and forgotten them, check the router’s manual or manufacturer’s website. You can also try resetting the router to factory settings to restore default login details, but be aware this will erase any custom settings you had.
Having the correct login info is crucial. Without it, you can’t access the settings to disable any band on your tri-band router. Are you ready to dive into the configuration now that you’ve got access?
Locating Band Settings
Locating the band settings on a tri-band router can be tricky. Understanding this process is key to managing your network efficiently. Each band has unique qualities, and knowing how to disable one can improve performance.
Navigating Wireless Settings
Start by accessing the router’s admin page. This is usually done by entering the router’s IP address in a browser. You’ll need your login credentials. Once logged in, find the wireless settings tab. It holds the key to managing your network bands.
Identifying Bands to Disable
In the wireless settings, you will see different bands listed. Tri-band routers typically offer 2.4GHz and two 5GHz bands. Each band has its own settings. Decide which band you want to disable. Consider the devices connected to each band. Disabling a band can affect device connections and network speed.
Step-by-step Band Disabling
Disabling one band on a tri-band router helps improve network focus and reduce interference. This process involves accessing your router’s settings and turning off the chosen frequency band. Each band—2.4 GHz, first 5 GHz, and second 5 GHz—can be disabled individually. Follow clear, simple steps to complete this task quickly and safely.
Disabling 2.4 Ghz Band
Log into your router’s admin panel using its IP address. Enter your username and password to access settings. Look for the wireless or Wi-Fi section. Find the 2.4 GHz band settings. There should be an option to disable or turn off this band. Save your changes and restart the router if needed. This stops devices from connecting to the 2.4 GHz frequency.
Disabling First 5 Ghz Band
Access the router’s admin interface as before. Navigate to the wireless settings area. Locate the first 5 GHz band options. Select the disable or off checkbox for this band. Confirm the setting and save the changes. Restart the router to apply the update. This limits connections to the remaining bands only.
Disabling Second 5 Ghz Band
Open your router’s control panel through the browser. Go to wireless or Wi-Fi settings. Identify the second 5 GHz band controls. Choose to disable or turn off this band. Save the new configuration. Restart the router if the system asks for it. This ensures the second 5 GHz band stops broadcasting.
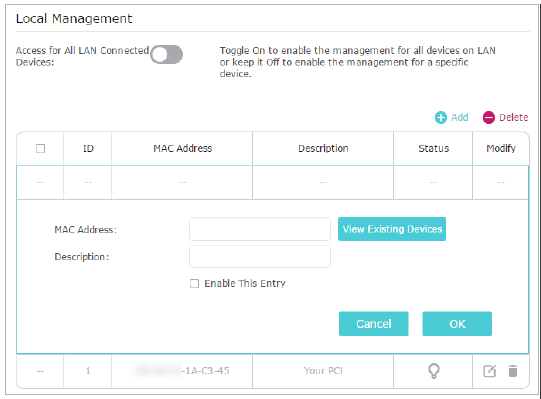
Credit: www.tp-link.com
Saving And Applying Changes
After disabling one band on your tri-band router, saving and applying the changes is essential. This step ensures the router updates its settings to match your preferences. Without saving, the adjustments will not take effect, and the band will remain active.
Always double-check your settings before proceeding. This prevents any mistakes and keeps your network running smoothly.
Confirming Settings Update
Look for a “Save” or “Apply” button in the router’s web interface. Click it to store your new configuration.
The router might show a confirmation message. This confirms the settings update was successful.
Some routers display the current status of each band. Verify the disabled band no longer shows as active.
Rebooting The Router If Needed
Many routers apply changes only after a reboot. Check if your device prompts you to restart.
Rebooting can be done through the interface or by unplugging the router for a few seconds.
Wait for the router to fully restart before testing the network.
This step ensures the disabled band is fully turned off and the router runs correctly.
Troubleshooting Common Issues
Troubleshooting is key when you try to disable one band on your tri-band router but things don’t go as planned. Small issues can cause big headaches, especially if the settings don’t take effect or your internet behaves oddly afterward. Understanding these common problems helps you fix them quickly and keeps your network running smoothly.
Band Not Disabling
If the band you want to disable stays active, start by double-checking the router’s admin panel. Sometimes, changes don’t save properly if you don’t click the final “Apply” or “Save” button. Have you ever clicked “Save” and realized you were logged out before the setting took effect? That can cause this issue.
Another reason could be firmware glitches. Make sure your router firmware is up to date. Outdated software can ignore or override your settings. If updating doesn’t help, try restarting the router after making changes.
Also, some routers don’t allow disabling certain bands entirely due to hardware or software restrictions. Check your router manual or manufacturer’s website to confirm if the band can be disabled.
Connectivity Problems After Change
Disabling one band might disrupt devices that rely on it. If you suddenly experience slow speeds or dropped connections, review which devices connect to the disabled band. Devices that only support that band may lose connection entirely.
Try reconnecting those devices manually to an active band. Sometimes devices default to a band that’s now off, causing confusion. You might also want to clear saved Wi-Fi networks on your devices and reconnect fresh.
Another tip is to check your router’s DHCP settings. Changing bands can affect how IP addresses are assigned, leading to conflicts or connection drops. Resetting DHCP or assigning static IPs might solve this.
Have you noticed that some devices struggle more than others after you disable a band? Identifying those devices helps you decide if you should keep the band active or adjust device settings for better compatibility.
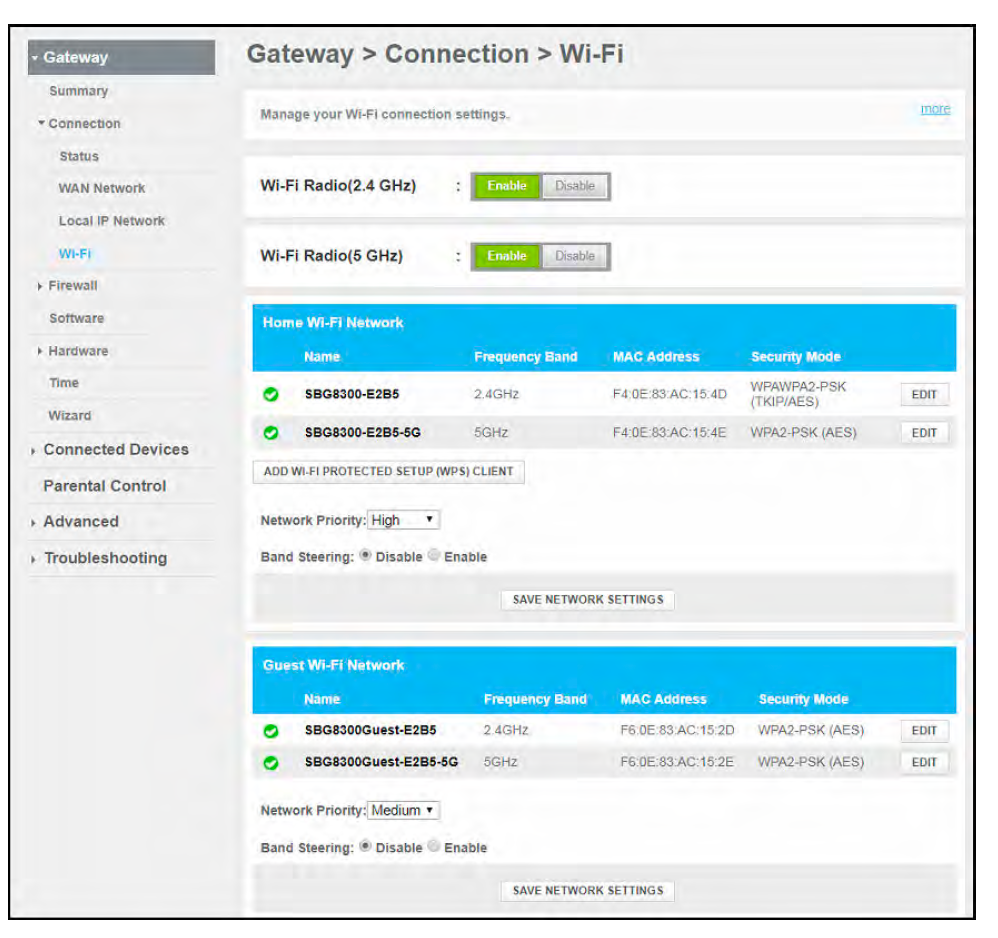
Credit: community.surfboard.com
Tips For Optimal Router Performance
Optimizing your tri-band router’s performance ensures fast and stable internet. Simple changes can improve speed and reduce interference. Focus on keeping the router updated, choosing the right channel, and placing the router correctly.
Firmware Updates
Keep your router’s firmware up to date. Updates fix bugs and improve security. They can also enhance network speed and stability. Check the router’s settings regularly for available updates. Install them as soon as possible to maintain smooth performance.
Channel Selection
Select the best channel for your Wi-Fi bands. Different channels reduce interference from other networks. Use tools or apps to find less crowded channels. Change channels in your router settings for better connection quality. This helps avoid slow speeds and dropped signals.
Placement Of Router
Place the router in a central, open area. Avoid corners, walls, and metal objects that block signals. Higher locations often provide better coverage. Keep the router away from other electronics that cause interference. Proper placement ensures strong Wi-Fi throughout your home.
Frequently Asked Questions
How Do I Disable One Band On A Tri Band Router?
Access your router’s admin panel via a browser. Navigate to the wireless settings. Locate the tri-band options, then disable the desired band by unchecking or toggling it off. Save changes and reboot the router if necessary.
Why Would I Disable A Band On My Tri-band Router?
Disabling a band can reduce interference and improve stability. It helps focus bandwidth on fewer bands, enhancing performance for specific devices. It also simplifies network management in crowded Wi-Fi environments.
Can Disabling One Band Improve My Wi-fi Speed?
Yes, it can improve speed if devices struggle with band interference. Focusing on fewer bands may reduce congestion and boost performance on active bands. However, results depend on your network setup and device compatibility.
Is It Safe To Disable A Band On My Router?
Yes, it’s safe as long as you don’t disable all bands. Your router will continue working on the active bands. Just ensure your devices support the remaining enabled bands for connectivity.
Conclusion
Disabling one band on your tri-band router helps manage your network better. It can reduce interference and improve device connection. Follow simple steps to access settings and turn off the unwanted band. This keeps your internet stable and easy to use.
Try these tips to control your Wi-Fi without confusion. A smooth network means better browsing and fewer problems. Keep your router set up to fit your needs. Easy changes can make a big difference in your home internet.