Are you tired of your internet connection dropping at the most inconvenient moments? If you’ve invested in a tri-band WiFi extender, you’re already on the right path to boosting your network’s reach and reliability.
But there’s a secret weapon to make your setup even more robust: setting a static IP address. Imagine a world where your WiFi extender seamlessly connects every single time, providing you with uninterrupted browsing, streaming, and working experiences. Setting a static IP might sound technical, but don’t worry.
With this guide, you’ll discover how straightforward it can be to enhance your home network. Let’s dive in and ensure your WiFi extender is always at its peak performance!
Prepare Your Network
Check your current IP settings by accessing your router’s admin page. Look for the DHCP client list or connected devices to find the extender’s current IP address. This helps avoid conflicts when assigning a new static IP.
Choose a static IP address within your router’s subnet but outside the DHCP range. This prevents IP conflicts and keeps your network stable. For example, if your router uses 192.168.1.x and DHCP assigns 192.168.1.2 to 192.168.1.100, pick an IP like 192.168.1.150.
Gather important details like the router’s IP address, subnet mask, gateway, and DNS servers. These details are necessary to set up the static IP correctly on your tri-band WiFi extender.
Access Extender Settings
Connect your device to the extender’s WiFi network. This network usually has a name similar to your main WiFi but with a suffix like “_EXT”.
Open a web browser and enter the extender’s IP addressin the address bar. This IP is often 192.168.0.1or 192.168.1.1. Login using the default username and password(check the extender label or manual).
Once logged in, find the Network Configurationor LAN Settingstab. This section allows you to change IP settings.
- Look for IP Addressfield.
- Enter the desired static IP addressthat fits your network.
- Save the settings.
Assign Static Ip Address
Start by logging into your tri-band WiFi extender’s web interface. Find the DHCP settings and disable DHCPto prevent automatic IP assignments. This step is key to using a static IP address.
Enter the static IP details carefully. You need to fill in:
- IP address:Choose an address within your router’s range but outside DHCP range.
- Subnet mask:Usually 255.255.255.0 for home networks.
- Default gateway:Your main router’s IP address.
- DNS servers:Use your router’s IP or public DNS like Google’s 8.8.8.8.
After entering details, save and apply changes. The extender may reboot. Check the connection to confirm the static IP works correctly.

Credit: www.tp-link.com
Verify Static Ip Configuration
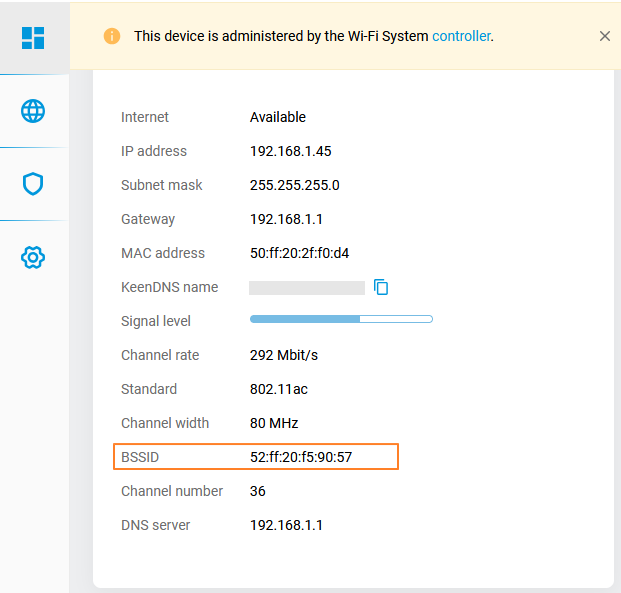
Check the connection statuson your device to confirm the static IP is active. Open the network settings and find the IP details. Ensure the IP address matches the one you set for the Tri Band Wifi Extender. The subnet mask and gateway should also be correct.
Test internet access by opening a browser and visiting a website. If pages load quickly, the connection works well. If not, try restarting the extender and your router.
Troubleshoot common issues by checking these points:
- Is the static IP within your network’s range?
- Are the DNS settings correct?
- Is the extender too far from the router?
- Are cables connected firmly?
- Have you rebooted the devices after changes?
Optimize Extender Performance
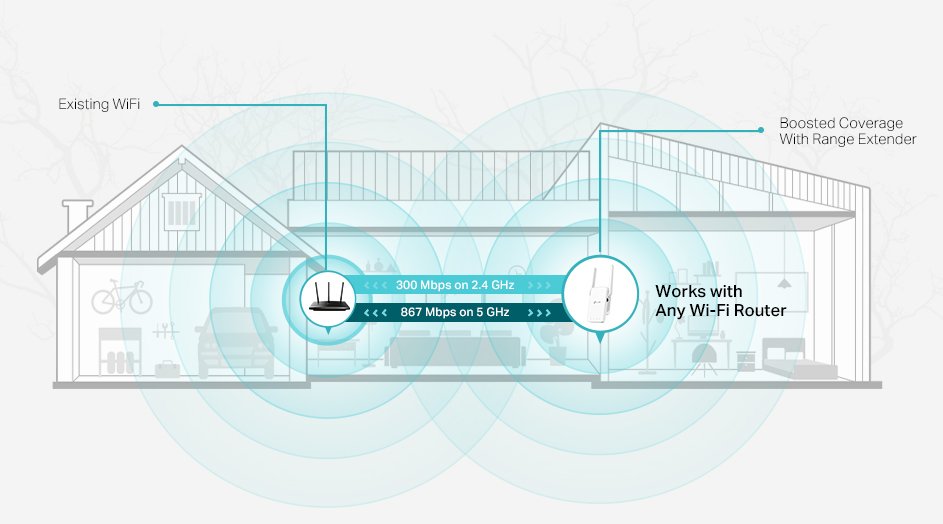
Place the extender where the WiFi signal is strong but still reaches the weak area. Avoid walls and metal objects between the router and extender. This helps the extender catch a better signal and spread it further.
Check the extender’s firmware often. Firmware updates fix bugs and improve performance. Visit the official website or use the extender’s app to find updates. Installing the latest firmware keeps your device working well.
Change the WiFi channel on the extender to reduce interference. Many devices use common channels, causing slow speeds. Use channels less crowded by other networks. This step can make your connection faster and more stable.
Credit: datafeature.com
Credit: support.keenetic.com
Frequently Asked Questions
How Do I Assign A Static Ip To My Tri-band Wifi Extender?
To assign a static IP, access your extender’s web interface. Navigate to network settings, locate IP configuration, and enter a fixed IP address within your router’s subnet. Save the changes to ensure consistent connectivity and avoid IP conflicts.
Why Set A Static Ip For A Tri-band Wifi Extender?
Setting a static IP prevents your extender’s address from changing. This ensures stable connections and easier network management. It helps avoid IP conflicts and improves device accessibility in your home network.
Can I Use Any Ip Address For My Extender?
No, use an IP within your router’s subnet range. Avoid addresses assigned to other devices. Check your router’s DHCP range and pick an IP outside that range but within the subnet.
What Are The Benefits Of A Static Ip On Wifi Extenders?
Static IPs provide stable network connections and prevent IP address conflicts. They simplify device management and improve overall network reliability, especially for tri-band WiFi extenders.
Conclusion
Setting a static IP for your tri-band WiFi extender keeps your network stable. It helps avoid connection drops and eases device management. Follow the steps carefully to assign the right IP address. This small change improves your internet experience at home or office.
Keep your devices connected without interruptions. Try this simple setup to enjoy a smoother WiFi connection every day.