Setting up a tri-band router might sound tricky, but it’s easier than you think—and it can make a huge difference in your internet speed and connection quality. If you want faster Wi-Fi for streaming, gaming, or working from home without interruptions, this guide is for you.
You’ll learn simple, step-by-step instructions to get your tri-band router running smoothly. Keep reading, and by the end, you’ll have a powerful network that keeps all your devices connected with ease.
Choosing The Right Tri Band Router
Choosing the right tri band router is important for a smooth internet experience. A good router can handle many devices without slowing down. It helps keep your home network fast and stable. Picking the best model depends on your needs and budget.
Key Features To Look For
- Speed: Check for high-speed ratings like Wi-Fi 6 or 6E for fast connections.
- Coverage: Make sure the router covers your entire home or office area.
- Number of Bands: Tri band routers have three bands, usually one 2.4 GHz and two 5 GHz bands.
- Device Support: Look for routers that support many devices at once without lag.
- Security: Features like WPA3 encryption help protect your network.
- Ports: Enough Ethernet ports for wired devices add flexibility.
- Ease of Setup: User-friendly interfaces and apps simplify installation and management.
Popular Models In The Market
| Model | Speed | Coverage | Special Features |
|---|---|---|---|
| Netgear Nighthawk AX12 | Up to 6 Gbps | Large homes | Wi-Fi 6, strong security |
| Asus RT-AX92U | Up to 4.6 Gbps | Medium to large homes | Mesh support, AiProtection |
| TP-Link Archer AX11000 | Up to 10 Gbps | Very large homes | Gaming features, Wi-Fi 6 |
| Linksys Velop MX10 | Up to 5.3 Gbps | Whole home mesh | Easy mesh setup, secure |
Preparing For Setup
Preparing your tri band router for setup ensures a smooth and fast installation. Taking time to get everything ready helps avoid delays and confusion. Clear space and gather all needed items before you start. Check your internet service to confirm it is active and stable. This preparation saves time and prevents errors during setup.
Gathering Necessary Equipment
Collect all items required for your router setup. This includes the tri band router itself and the power adapter. Have an Ethernet cable ready for connecting to your modem. Keep your modem nearby for easy access. A computer or smartphone will help access the router settings. Having a notebook and pen can help note down important information like passwords.
- Tri band router
- Power adapter
- Ethernet cable
- Modem
- Computer or smartphone
- Notebook and pen
Checking Internet Connection
Verify your internet connection before starting the router setup. Ensure your modem is connected and working properly. Test the connection on a device using an Ethernet cable. Confirm internet speed matches your service plan. Restart your modem if the connection is slow or unstable. A stable internet connection helps the router configure correctly.
Physical Installation
Physical installation is the first step to get your tri band router up and running. Proper setup ensures strong and stable Wi-Fi signals throughout your space. It involves choosing the right spot and making correct cable connections. This section guides you through these essential tasks.
Placing Your Router For Best Coverage
Place the router in a central location in your home or office. Avoid corners, thick walls, and metal objects that block signals. Higher spots, like shelves or tables, improve signal reach. Keep the router away from other electronics to reduce interference.
Open areas work best for signal spread. Try to position antennas vertically for wider coverage. Remember, the router sends three bands, so clear space helps all bands perform well.
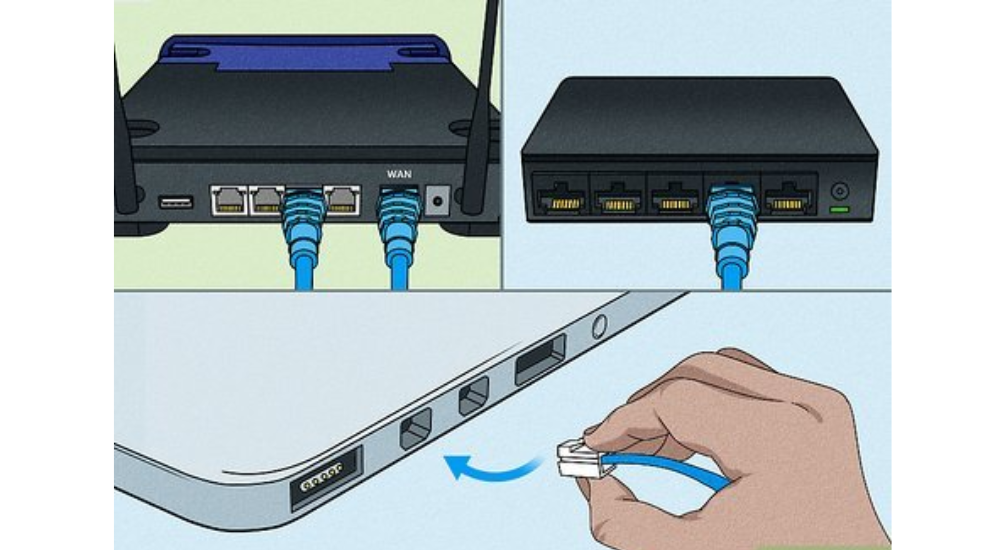
Connecting Cables Correctly
Start by plugging the power adapter into the router and an outlet. Connect the internet cable (usually from your modem) to the router’s WAN or Internet port. Use Ethernet cables to link wired devices like computers or gaming consoles to LAN ports.
Check all connections are snug and secure. Loose cables cause slow or no internet. Avoid twisting or bending cables sharply. This keeps the connection stable and protects the cables from damage.
Accessing Router Settings
Accessing your router settings is essential to set up a tri-band router. Open a web browser and enter your router’s IP address in the search bar. Log in with your credentials to access the settings and follow the setup instructions for optimal performance.
Accessing your router settings can feel like unlocking a secret world of control over your home network. Once you get the hang of it, you’ll wonder why you didn’t do it sooner. It’s simpler than you might think, and it all starts with finding a specific set of numbers.Finding The Router’s Ip Address
Your router’s IP address is like its home address on the internet. Most routers use a default IP address like 192.168.0.1 or 192.168.1.1. To find yours, check the label on the bottom of your router or the manual that came with it. If you’re like me and tend to misplace manuals, don’t worry; you can also find it on your computer. On a Windows PC, open the Command Prompt and type ipconfig. Look for the “Default Gateway” under your network connection. On a Mac, go to System Preferences, then Network, and select your network connection. You’ll see the IP address next to “Router.”Logging Into The Admin Panel
Once you have the IP address, open a web browser. Type the IP address into the address bar and hit enter. This will take you to the router’s login page. You’ll need the admin username and password, which are often “admin” and “password” by default. However, if you’ve changed these (which is a smart move), use your custom credentials. If you’ve forgotten your details, a quick reset of the router can restore the default settings. Just be aware that this will erase any custom settings you’ve configured. After logging in, you’ll have access to a range of settings to optimize your network. From changing the Wi-Fi password to setting up parental controls, your router’s admin panel is a powerful tool at your fingertips. Have you ever considered how secure your network is? Accessing and understanding your router’s settings is a crucial step in safeguarding your digital space.Configuring Network Bands
Configuring the network bands on your tri-band router is a crucial step to get the best performance from your internet connection. Each band—typically one 2.4 GHz and two 5 GHz frequencies—serves different devices and needs its own settings. Setting them up properly can boost speed, reduce interference, and improve your overall network experience.
Naming Each Band
Giving each band a clear and distinct name makes it easier to identify on your devices. Instead of default names like “NETGEAR_5G” or “Linksys_2.4,” try adding something personal or descriptive.
- Use names like Home_2.4GHzor Office_5GHz_Main.
- Consider including location or device type to help family members connect properly.
- Keep names simple and avoid spaces or special characters to prevent connection issues.
Once, I named my 5 GHz bands as “Gaming_5GHz” and “Streaming_5GHz.” This helped me prioritize devices on the right band without confusion. Could clear naming help you organize your devices better?
Setting Passwords For Security
Security comes first when setting passwords for each network band. Each band should have its own strong, unique password to prevent unauthorized access.
- Choose passwords with at least 12 characters combining letters, numbers, and symbols.
- Avoid common words or easily guessable info like birthdays or “password123.”
- Use a password manager to keep track of your passwords securely.
Remember, the 2.4 GHz band is more prone to interference and is often targeted by attackers because of its longer range. Securing it with a strong password protects all your devices connected to that band. Have you checked how strong your current Wi-Fi passwords are?

Credit: www.youtube.com
Optimizing Speed And Performance
Optimizing the speed and performance of a tri band router is key to a smooth internet experience. It reduces lag, boosts connection stability, and balances devices effectively. Small tweaks can make a big difference in how your network performs.
Choosing The Best Channels
Tri band routers use multiple channels to send data. Some channels get crowded, causing slowdowns. Select channels with less interference to improve speed.
- Use a Wi-Fi analyzer app to find free channels.
- Choose channels with the least traffic in 2.4GHz and 5GHz bands.
- Avoid overlapping channels to reduce signal clash.
- Set the router to auto-select channels if unsure.
Adjusting Bandwidth Allocation
Bandwidth allocation controls how much data each band handles. Proper allocation ensures no band gets overloaded.
- Assign more bandwidth to the 5GHz bands for faster devices.
- Keep the 2.4GHz band for devices needing longer range.
- Limit bandwidth for less important devices to save speed.
- Check router settings for Quality of Service (QoS) options to prioritize traffic.
Enabling Advanced Features
Enabling advanced features on your tri band router can dramatically improve your network’s performance and security. These settings let you tailor your connection to fit your unique needs, whether it’s prioritizing devices or creating separate networks for guests. Understanding and activating these features ensures you get the most out of your router.
Setting Up Quality Of Service (qos)
Quality of Service (QoS) helps you control how bandwidth is distributed among your devices. This is especially useful if you have multiple users streaming, gaming, or working from home simultaneously. By setting QoS rules, you can prioritize important traffic, like video calls or online gaming, over less critical tasks.
To set up QoS, access your router’s admin panel and find the QoS section. You can typically assign priority levels to specific devices or applications. For example, you might give your work laptop high priority to avoid interruptions during meetings.
Have you noticed your video calls lag when someone else starts streaming? Adjusting QoS settings can fix that by ensuring smooth connectivity for your essential tasks.
Activating Guest Networks
Guest networks provide a separate Wi-Fi connection for visitors without giving them access to your main network. This keeps your personal files and devices safe while still offering convenient internet access to guests. Most tri band routers allow you to create multiple guest networks, sometimes even on different frequency bands.
To activate a guest network, go to your router’s wireless settings and enable the guest access option. You can name the network and set a password to control who connects. You might also limit bandwidth for guest users to prevent them from slowing down your main network.
Ever worried about sharing your Wi-Fi password with visitors? Guest networks solve this by isolating their access, so your personal data stays protected.

Credit: www.youtube.com
Testing And Troubleshooting
Testing and troubleshooting your tri-band router ensures it works at its best. This step helps find any connection problems early. It also verifies your network speed matches your internet plan. Following simple checks can keep your router running smoothly and avoid frustration.
Checking Connection Speeds
Start by testing your internet speed on different bands. Use speed test websites or apps to measure the download and upload rates. Test on the 2.4 GHz band and both 5 GHz bands separately. Compare results with your internet plan’s promised speed.
Check speeds near the router and farther away. This reveals if distance affects performance. If speeds are low on one band, try changing the channel in router settings. Restart the router and test speeds again to see if it improves.
Fixing Common Issues
Slow speeds, dropped connections, or no internet often happen with routers. Begin by rebooting your router. Unplug it, wait 30 seconds, then plug it back in.
Check all cables for damage or loose connections. Update your router firmware regularly to fix bugs and improve stability.
Interference from other electronics or thick walls can reduce signal strength. Move the router to a central, open spot in your home.
Reset the router to factory settings if problems continue. Reconfigure your network afterward carefully.
Contact your internet provider if issues remain unresolved after these steps.
Credit: blog.jazzcybershield.com
Frequently Asked Questions
What Is A Tri Band Router And Why Use It?
A tri band router has three separate Wi-Fi bands. It reduces network congestion and improves speed. Ideal for multiple devices and heavy internet use.
How Do I Connect Devices To A Tri Band Router?
Connect devices via Wi-Fi or Ethernet. Use the router’s SSID and password. Assign devices to different bands for optimal performance.
Can I Use A Tri Band Router With My Isp?
Yes, tri band routers work with most ISPs. Connect the router to your modem using an Ethernet cable. Configure settings based on your ISP’s requirements.
How To Optimize Tri Band Router Settings For Best Speed?
Access router settings via its IP address. Enable smart connect or band steering. Position the router centrally and update firmware regularly.
Conclusion
Setting up a tri-band router is easier than it seems. Follow the steps carefully for the best results. Make sure to place your router in a central spot for strong signals. Use different bands for different devices to avoid slow speeds.
Keep your firmware updated to stay secure and fast. Enjoy better Wi-Fi coverage and fewer interruptions. A good setup helps all your devices work smoothly together. Take your time, and your network will run well every day. Simple steps, big difference.