Are you struggling to get a steady internet connection on your laptop while traveling? A travel router can be your best friend, turning any Wi-Fi spot into a reliable network just for you.
But how exactly do you connect your travel router to your laptop without hassle? In this guide, you’ll discover simple, step-by-step instructions that make the process quick and easy. By the end, you’ll enjoy fast, secure internet no matter where you are.
Keep reading to unlock the secret to staying connected on the go!

Credit: www.theverge.com
Choose The Right Travel Router
Choosing the right travel router makes your trip easier and safer. A good router offers reliable internet access wherever you go. It fits your travel style and device needs. Picking the best one saves time and avoids technical troubles.
Types Of Travel Routers
- Portable Hotspot Routers:Small devices that create Wi-Fi using a SIM card.
- Battery-Powered Routers:Work without power outlets, great for outdoor use.
- Plug-In Travel Routers:Require power but offer stronger signals and more features.
- Multi-Mode Routers:Combine wired, wireless, and hotspot functions for flexibility.
Key Features To Consider
- Compatibility:Must support your laptop’s Wi-Fi standards (e.g., 802.11ac).
- Security:Look for WPA3 or WPA2 encryption to protect your data.
- Size and Weight:Choose compact and lightweight models for easy carrying.
- Battery Life:Longer battery life suits longer trips without charging.
- Speed:Higher Mbps ensures smooth browsing and streaming.
- Ports:Extra USB or Ethernet ports add connection options.
Prepare Your Laptop
Preparing your laptop before connecting a travel router ensures a smooth setup. This step avoids connection problems and saves time. Proper preparation helps your laptop recognize the router quickly. Follow these tips to get your laptop ready for connection.
Check Network Settings
Open the network settings on your laptop. Confirm Wi-Fi is turned on and ready. Look for available networks to see if your travel router appears.
Turn off any VPN or firewall that might block new connections. Set your IP settings to obtain an address automatically.
- Go to Control Panel or Settings
- Select Network and Internet
- Click on Wi-Fi or Ethernet
- Check for active connections
Update Network Drivers
Outdated drivers cause connection issues. Keep your network drivers updated for better performance. Use the device manager to check driver status.
- Open Device Manager
- Find Network Adapters
- Right-click your adapter and select Update Driver
- Choose to search automatically for updates
Restart your laptop after updating drivers to apply changes. This step helps the laptop communicate well with the travel router.
Power On And Reset The Router
Powering on and resetting your travel router is a key step before connecting it to your laptop. This ensures the device starts fresh and works correctly. Resetting clears old settings that might cause issues. Proper setup helps establish a stable and secure connection.
Initial Setup
First, plug the travel router into a power source. Use the provided adapter or USB cable. Wait for the power light to turn on. This shows the router is active. Next, check the router’s manual for any specific startup instructions. Usually, the router boots automatically.
After powering on, connect your laptop to the router’s Wi-Fi network. The network name and password often appear on a label under the router. Open your laptop’s Wi-Fi settings and select the router’s network. Enter the password to connect. Now your laptop links to the router’s internet signal.
Factory Reset Steps
Resetting the router restores default factory settings. This helps fix problems or clear old configurations. Find the reset button on the router’s back or bottom. It is usually small and may need a pin or paperclip to press.
- Hold the reset button for about 10 seconds.
- Release the button when lights on the router blink or change.
- Wait for the router to restart automatically.
After the reset, the router returns to its original state. Use the default network name and password to reconnect your laptop. Resetting is useful if the router won’t connect or if you forget the password.
Credit: www.notebookcheck.net
Connect Via Wi-fi
Connecting your travel router to a laptop via Wi-Fi is simple and convenient. This method lets you access the internet without cables. Your laptop connects to the router’s wireless network, just like any Wi-Fi hotspot.
The process takes only a few moments. It works anywhere you bring your travel router, whether in a hotel, café, or on the road.
Find The Router Network
Turn on your travel router and wait for it to broadcast its Wi-Fi signal.
On your laptop, open the Wi-Fi settings panel.
Look for the router’s network name, also called the SSID. This name usually matches the router brand or model.
If you don’t see the network, refresh the list or move closer to the router.
Enter Password And Connect
Click on the router’s network name to connect.
A password prompt will appear. Enter the password found on the router’s label or user manual.
Make sure to type the password correctly, including uppercase and lowercase letters.
Once connected, your laptop will show a Wi-Fi icon indicating a successful link.
Open a browser to check your internet connection and start browsing.
Connect Using Ethernet Cable
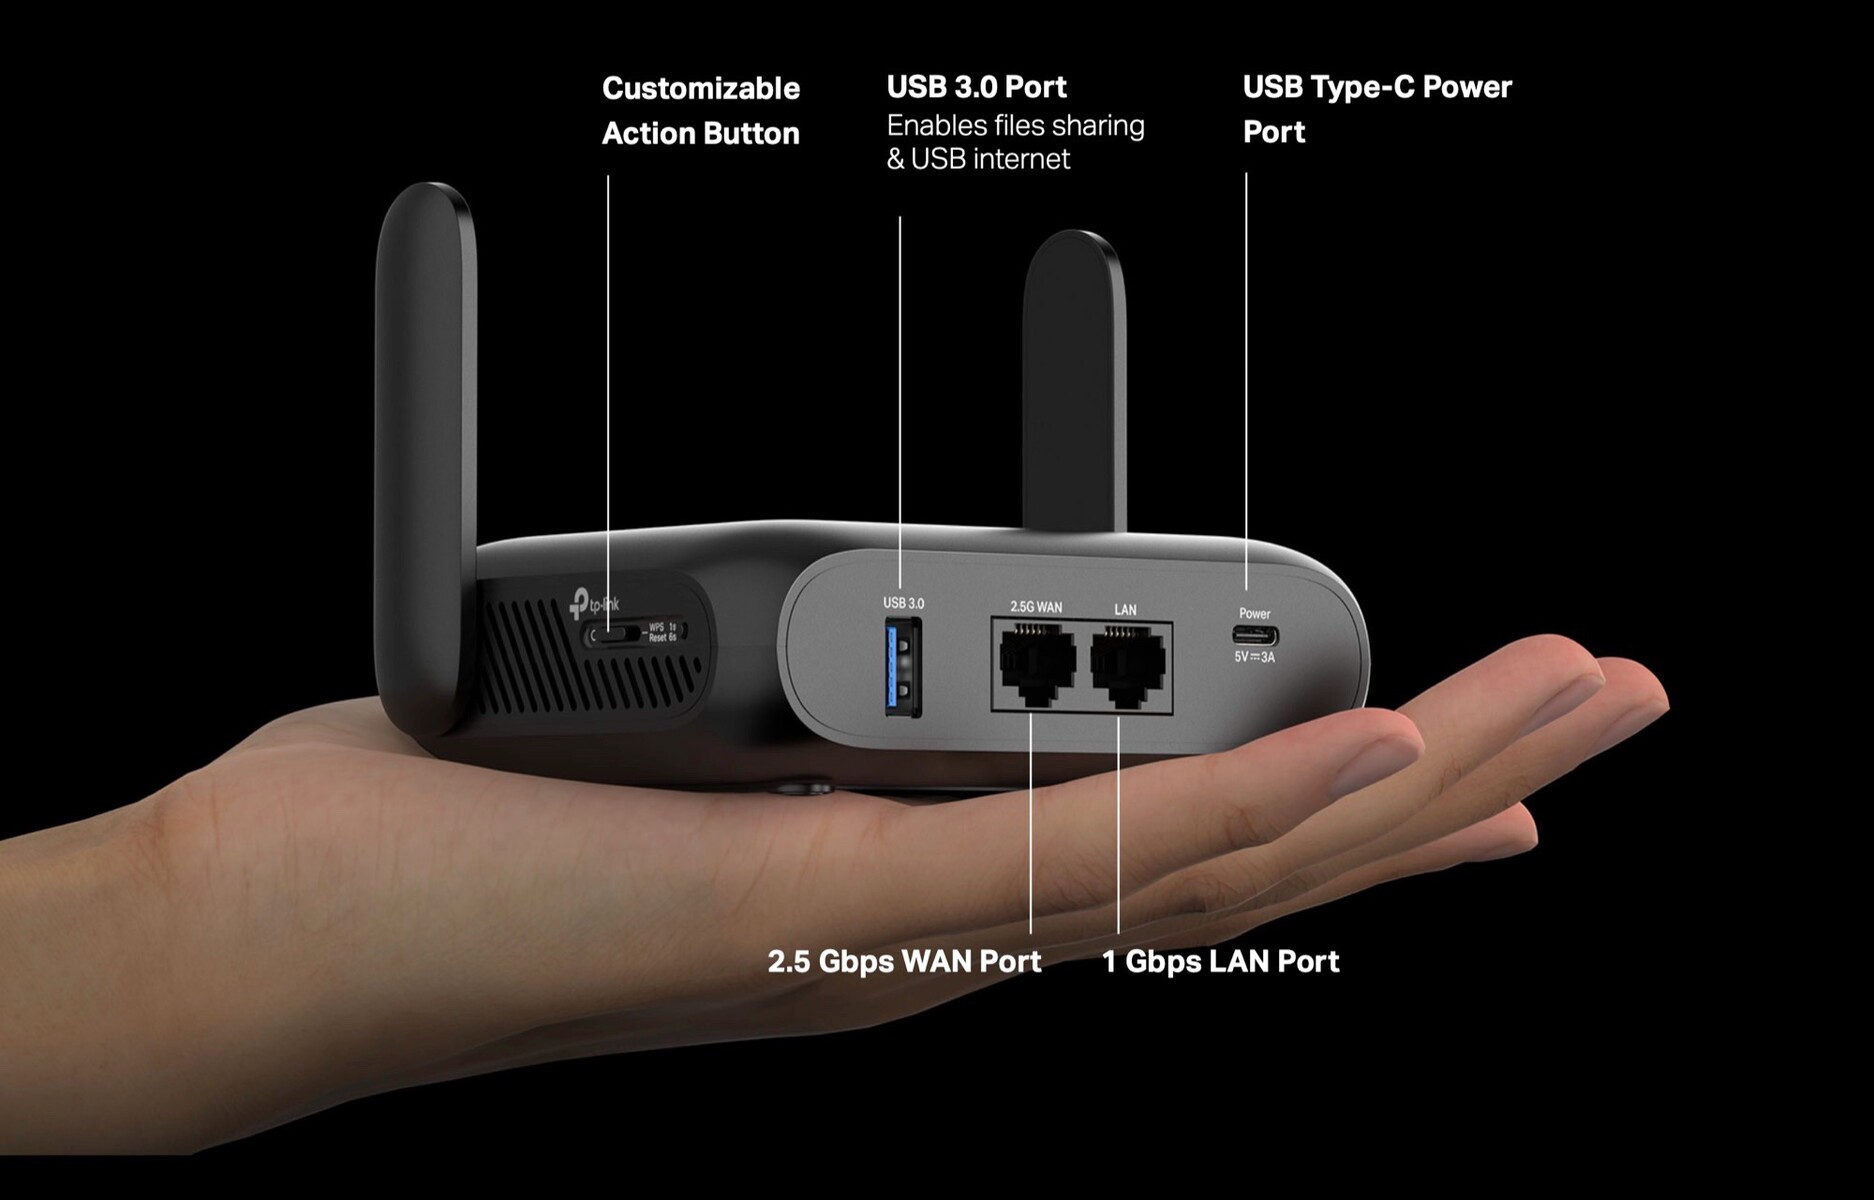
Connecting a travel router to a laptop using an Ethernet cable is simple. Plug one end into the router and the other into the laptop’s Ethernet port. This direct connection offers a stable and fast internet link.
Connecting your travel router to a laptop using an Ethernet cable offers a stable connection. This method ensures consistent internet speed without wireless interference. Follow these simple steps to establish a wired connection between your travel router and laptop.Locate Ethernet Ports
Find the Ethernet port on your travel router. It usually looks like a wider phone jack. Next, locate the Ethernet port on your laptop. Most laptops have this port on the side. If your laptop lacks an Ethernet port, consider using a USB to Ethernet adapter.Configure Wired Connection
Insert one end of the Ethernet cable into the router’s port. Connect the other end to your laptop’s Ethernet port. Once connected, your laptop may automatically configure the network settings. If not, open your laptop’s network settings. Choose the option to add a new network connection. Select ‘Ethernet’ and follow the prompts to complete setup. Ensure your laptop is set to obtain an IP address automatically. This allows it to communicate with the router.Access Router Settings
Accessing your travel router’s settings allows you to customize its functions. This step is key to managing your network securely. You can change passwords, update firmware, and set up other preferences.
Connecting your laptop to the router is the first task. After that, open the router’s admin page to access these settings. The process involves using a web browser and knowing the correct login details.
Open Router Admin Page
Connect your laptop to the travel router via Wi-Fi or Ethernet cable. Open any web browser like Chrome or Firefox. Type the router’s IP address into the address bar. Common IPs include 192.168.0.1or 192.168.1.1. Press Enter to load the page.
If unsure about the IP, check the router’s label or manual. Alternatively, use the command prompt on your laptop and type ipconfig. Look for the “Default Gateway” under your network connection. This is your router’s IP address.
Login Credentials
The admin page asks for a username and password. These details are often on a sticker on the router. Typical defaults are username adminand password adminor password.
Enter the credentials carefully. If you changed them before, use your custom login. Wrong entries lock you out temporarily. Reset the router if you forget your password. Use the reset button on the device for 10 seconds.
Configure Internet Connection
Configuring the internet connection on your travel router is essential to access the web through your laptop. This setup ensures your router communicates correctly with your internet provider. The process includes choosing the right connection type and entering the necessary ISP details.
Select Connection Type
First, access your travel router’s web interface by typing its IP address in your laptop’s browser. Look for the internet setup or WAN settings section. You will see different connection types such as DHCP, PPPoE, Static IP, or 3G/4G. Choose the one that matches your internet service.
- DHCP:Automatically gets an IP address from your ISP.
- PPPoE:Requires a username and password from your ISP.
- Static IP:You enter a fixed IP address given by your ISP.
- 3G/4G:Uses a SIM card for mobile internet connection.
Pick the correct type carefully. Selecting the wrong one stops your internet from working.
Enter Isp Details
After selecting the connection type, enter the details your ISP provided. For PPPoE, type your username and password exactly as given. For Static IP, fill in the IP address, subnet mask, gateway, and DNS servers. Make sure all entries are accurate to avoid connection problems.
Save your settings and reboot the router if needed. Your travel router will connect to the internet, allowing your laptop to access the web smoothly.
Set Up Wireless Network
Setting up the wireless network on your travel router is a key step to ensure a smooth and secure internet connection for your laptop. This process involves customizing your network’s name and securing it against unauthorized access. You’ll want to make your network easy to recognize but hard for others to guess.
Change Ssid And Password
The SSID is the name your travel router broadcasts to nearby devices. Changing it from the default name helps you quickly identify your network, especially in crowded places like hotels or airports.
Pick a unique SSID that’s easy for you to remember but doesn’t give away personal information. Avoid using your name or address.
Next, set a strong password. Use a mix of letters, numbers, and symbols to make it tough to crack. Think about how you create passwords for your important accounts—apply the same care here.
Enable Security Features
Securing your wireless network is crucial. Without it, anyone nearby could connect to your router, potentially accessing your data or slowing your connection.
Look for security options like WPA3 or WPA2 in your router settings. These encryption methods protect your data as it travels between your laptop and the router.
Also, consider disabling WPS (Wi-Fi Protected Setup). Though convenient, it can open doors to hackers. Instead, rely on your custom password for safer access.
Test The Connection
Ensure the travel router is powered on and connected to your laptop’s Wi-Fi or Ethernet port. Check for internet access by opening a website or running a network test. Confirming the connection avoids interruptions during travel or work.
Testing the connection between your travel router and laptop is a crucial step to ensure seamless internet access during your travels. Once you’ve set up your travel router, it’s time to confirm everything is functioning smoothly. Verifying the connection will prevent any frustrating technical hiccups when you need to be online the most.Check Internet Access
After connecting your laptop to the travel router, open your web browser. Try visiting a familiar website to see if it loads correctly. If the page appears, you’re successfully connected to the internet. You might want to run a speed test to see how fast your connection is. Websites like Speedtest.net can provide a quick assessment. This is especially useful if you’re planning to stream content or conduct video calls.Troubleshoot Common Issues
If you’re unable to access the internet, don’t worry. There are a few common issues that can be easily resolved. First, ensure your laptop’s Wi-Fi is enabled and connected to the correct network. Double-check the network name and password; a simple typo can be the culprit. If the problem persists, try restarting both the travel router and your laptop. Sometimes, a quick reboot can solve connectivity issues. Consider checking the router’s LED indicators. If there’s a red light or no light at all, it might indicate a problem with the router itself or the internet source. Is your travel router placed too far from your laptop? Proximity can affect signal strength, so try moving closer to the router. Remember, patience is key. A bit of troubleshooting goes a long way in ensuring you stay connected wherever you roam.Tips For Travel Router Use
Using a travel router can make your trips smoother, but it’s important to get the most out of it. Small adjustments in how you manage your device can save you time, extend its usability, and protect your data. Here are some practical tips that help you maximize your travel router experience.
Optimize Battery Life
Travel routers run on limited battery, so conserving power is key. Turn off the router when you don’t need Wi-Fi access, like during flights or long breaks. Dim any indicator lights if your model allows it, as they can drain power over time.
Adjust your router’s settings to lower power consumption. Some routers let you reduce signal strength to cover only the immediate area, which saves energy. Also, consider carrying a portable power bank to recharge your router without hunting for outlets.
Have you noticed your router dying at the worst times? Keeping a charging schedule can prevent dead batteries from disrupting your connection.
Maintain Security On Public Networks
Public Wi-Fi is convenient but can expose your data to risks. Use your travel router to create a private network, adding a layer of protection between your devices and the public hotspot. Always set a strong password on your router’s network to block unauthorized access.
Enable encryption protocols like WPA3 if your router supports it. This keeps your data scrambled and hard for hackers to intercept. Avoid sharing sensitive information or logging into secure accounts over public networks without this protection.
Have you ever wondered how safe your connection really is in a café or hotel? Taking these security steps means you control who can use your network, making your online activities safer no matter where you are.

Credit: www.eiotclub.com
Frequently Asked Questions
How Do I Connect A Travel Router To My Laptop?
To connect, power on the travel router and enable its Wi-Fi. On your laptop, find the router’s network name and enter the password. Once connected, your laptop will access the internet through the travel router.
What Settings Are Needed For Travel Router-laptop Connection?
Ensure your laptop’s Wi-Fi is enabled. Use the router’s default IP address to access its settings page. Configure the SSID, password, and security type. Save settings and reconnect your laptop to the updated network.
Can I Use A Travel Router With Any Laptop?
Yes, travel routers are compatible with most laptops that support Wi-Fi. They work with Windows, macOS, and Linux systems, provided the laptop has a wireless network adapter.
Why Isn’t My Laptop Connecting To The Travel Router?
Check if the travel router is powered on and broadcasting Wi-Fi. Verify the correct network and password are used. Restart both devices and ensure no IP conflicts or firewall blocks exist.
Conclusion
Connecting a travel router to your laptop is simple and quick. Just follow the steps carefully. This allows you to share internet easily while traveling. A stable connection keeps you online for work or fun. Remember to check the router’s settings before use.
Always keep your devices secure for safe browsing. Now, you can enjoy better internet anywhere you go. Stay connected and explore without worries.