Are you tired of lag spikes and connection drops ruining your gaming sessions? Setting a static IP on your gaming router can be the simple fix you need to keep your gameplay smooth and stable.
By assigning a fixed address to your device, you ensure faster communication with your network and avoid frustrating interruptions. You’ll discover easy, step-by-step instructions to set a static IP on your gaming router—no complicated tech jargon, just clear guidance that gets you back to what matters most: winning.
Keep reading to take control of your connection and elevate your gaming experience.
Credit: www.tp-link.com
Benefits Of Static Ip For Gaming
Setting a static IP address on your gaming router can significantly improve your gaming experience. It ensures your device always uses the same IP address, which simplifies network management and boosts performance in several ways. Let’s look at the key benefits that a static IP brings to your gaming setup.
Reduced Lag And Latency
Lag and latency are the biggest enemies of smooth gaming. A static IP helps reduce these issues by minimizing the time your router spends assigning a new IP each time you connect. This consistency means your connection is faster and more reliable, especially in multiplayer games where every millisecond counts.
Imagine jumping into an intense match only to be slowed down by connection hiccups caused by dynamic IP changes. By locking your IP, you avoid these interruptions and keep your gameplay seamless.
Stable Connection
A static IP provides a stable connection because it doesn’t change over time. This stability helps prevent disconnections during long gaming sessions, which can be frustrating and costly in competitive environments.
With a static IP, you won’t have to worry about your router resetting or your device losing connection mid-game. This constant connection makes your gaming experience more predictable and enjoyable.
Improved Port Forwarding
Port forwarding is crucial for many online games to work correctly. With a static IP, setting up port forwarding becomes much easier and more effective since your router knows exactly where to send incoming data.
This means fewer issues with NAT types and better matchmaking. You won’t have to repeatedly configure settings, and your games will connect faster to servers and other players.
Preparing Your Network
Setting a static IP on your gaming router starts with preparing your network. Proper preparation ensures smooth setup and stable connection. This phase includes collecting important router details and understanding your current IP settings. These steps help avoid conflicts and maintain network performance.
Gathering Router Information
Begin by finding your router’s IP address. This is the gateway to access its settings. Common addresses include 192.168.0.1 or 192.168.1.1. Next, locate your router’s login credentials. They are often on a sticker or in the manual. Knowing your router model helps find specific instructions online.
Checking Current Ip Settings
Check the current IP settings on your device. This shows the current IP address, subnet mask, and default gateway. On Windows, use the command prompt and type ipconfig. On Mac, open Network Preferences. Write down these details for reference.
Also, check the DHCP range in your router’s settings. The DHCP range shows which IP addresses the router assigns automatically. Choose a static IP outside this range to avoid conflicts.
Accessing Router Settings
Accessing your gaming router’s settings is the first step to set a static IP address. You need to connect to the router’s control panel through a web browser. This panel allows you to change network settings and improve your gaming experience.
Before changing any settings, ensure your device is connected to the router’s network. This connection can be wired or wireless. Once connected, you can open the router’s interface to make changes.
Logging Into The Router
Open a web browser on your computer or mobile device. Type the router’s IP address into the address bar. Common IP addresses include 192.168.1.1or 192.168.0.1. Press Enter to load the login page.
Enter the username and password. These credentials are often on a sticker on the router or in the manual. The default username is usually “admin” and the password is “admin” or “password”. Change these later for security.
If login details are unknown, reset the router to factory settings. Hold the reset button for 10 seconds using a paperclip. This action restores default login information.
Locating Ip Configuration
After logging in, find the section for network settings. This section may be labeled as “LAN Setup”, “Network”, or “DHCP Settings”. The layout varies by router brand and model.
Look for the IP address assignment area. You will see options for dynamic (DHCP) or static IP addresses. Select the static IP option to proceed.
Note the range of IP addresses allowed by your router. Choose an IP outside this range to avoid conflicts. This step helps keep your network stable and reliable.
Assigning A Static Ip
Set a static IP on your gaming router for better connectivity. Access the router settings through its IP address. Then, enter a specific IP address for your device to ensure a stable connection during gameplay.
Assigning a static IP to your gaming router can significantly enhance your gaming experience. By doing so, you ensure a stable connection and reduce lag during crucial gaming moments. It may seem technical at first, but with a bit of guidance, you’ll find it’s a straightforward process.Choosing The Right Ip Address
Start by selecting an IP address that is outside your router’s DHCP range. This prevents any conflicts with other devices on your network. For instance, if your DHCP range is 192.168.1.2 to 192.168.1.100, consider an IP like 192.168.1.150. Make sure the IP address you choose is not currently in use by another device. You can check this by accessing your router’s connected devices list.Configuring Ip On Router
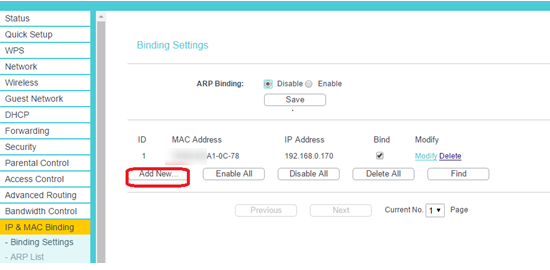
Log into your router’s admin panel using a web browser. This usually involves typing your router’s IP address into the address bar. Navigate to the LAN settings section where you can assign static IPs. Enter the chosen IP address, and link it to your gaming console’s MAC address. This ensures the IP is permanently assigned to your console.Saving And Applying Changes
After configuring the IP, ensure you save your changes. Most routers have a ‘Save’ or ‘Apply’ button at the bottom of the settings page. Reboot your router to apply the changes fully. This step ensures that the static IP assignment takes effect, providing a smoother gaming experience. Have you ever wondered why your connection drops in the middle of a game? Assigning a static IP could be the solution. With these steps, you’re on your way to uninterrupted gaming sessions.Configuring Gaming Devices
Configuring gaming devices with a static IP improves network stability. A fixed IP helps avoid conflicts and eases port forwarding. This setup boosts online gaming performance and reduces lag.
Each device requires a unique IP address. Choose one outside the router’s DHCP range to prevent overlaps. Let’s explore setting static IPs on popular gaming devices.
Setting Static Ip On Pc
Open the Control Panel or Settings on your PC. Find the network settings section.
- Select your active network connection (Ethernet or Wi-Fi).
- Click on “Properties” and scroll to “Internet Protocol Version 4 (TCP/IPv4).”
- Choose “Use the following IP address.”
- Enter your desired IP address, subnet mask, and default gateway.
- Fill in preferred DNS server addresses for better resolution.
- Save changes and restart your network connection.
Your PC now uses a static IP, ensuring stable gaming connections.
Setting Static Ip On Consoles
Access the network settings on your console. This varies by brand but usually appears in system settings.
- Locate the IP address section under network setup.
- Choose manual or static IP configuration.
- Enter a fixed IP address, subnet mask, and gateway matching your network.
- Input DNS server details for smoother gameplay.
- Save and test the connection to confirm setup.
Static IP on consoles reduces disconnections and improves multiplayer sessions.
Testing The Connection
Testing the connection after setting a static IP on your gaming router ensures everything works correctly. It confirms your device uses the assigned IP without issues. This step helps avoid lag or disconnections during gameplay.
Verifying Ip Assignment
Check if your gaming device has the correct static IP address. Open the network settings on your device. Look for the current IP address and compare it with the one you set on the router.
You can also use the router’s admin panel to see connected devices and their IPs. Confirm your device’s IP matches the static IP assigned.
Checking Network Stability
Test the connection stability by running a ping test. Open the command prompt or terminal on your device. Type ping 8.8.8.8and press enter.
Look for consistent response times without packet loss. If the ping shows timeouts or high delays, your connection might be unstable.
Try playing an online game to check for smooth gameplay. Stable network performance means the static IP setup works well.
Troubleshooting Common Issues
Troubleshooting is key to keep your gaming router running smoothly. Setting a static IP can cause some common problems. Knowing how to fix these helps maintain a stable connection. Below are simple solutions to frequent issues.
Ip Conflicts
IP conflicts happen when two devices share the same IP address. This causes network errors and disconnects.
- Check your router’s IP range to avoid overlaps.
- Assign static IPs outside the DHCP range.
- Restart devices to refresh network settings.
- Use your router’s interface to view connected devices.
Connection Drops
Connection drops can interrupt gaming sessions. Static IP settings might cause these if not done correctly.
- Ensure the IP address matches your network’s subnet.
- Confirm the router firmware is updated.
- Check cable connections for damage or looseness.
- Test with another device to isolate the problem.
Router Reset Tips
Resetting your router can fix many issues but requires care.
- Back up your current settings before reset.
- Use the reset button for a full factory reset.
- Re-enter static IP settings carefully after reset.
- Restart all connected devices to sync with the router.

Credit: www.reddit.com
Advanced Tips For Lag-free Gaming
Getting a static IP on your gaming router is a great start, but to truly experience lag-free gaming, you need to fine-tune your setup. These advanced tips target the root causes of lag and packet loss, helping you maintain a steady and fast connection. Let’s dive into practical ways to boost your gaming performance beyond just the IP configuration.
Quality Of Service (qos) Settings
QoS lets you prioritize gaming traffic over other types of data on your network. By setting your gaming device at the top of the priority list, you reduce interruptions caused by downloads or streaming happening simultaneously.
Access your router’s QoS settings and assign high priority to your console or PC’s static IP address. This ensures your game packets get through faster, cutting down on lag spikes. Have you checked if your router supports QoS? Many gaming routers have simple interfaces for this.
Firmware Updates
Router manufacturers frequently release firmware updates that fix bugs and improve performance. Skipping these updates can leave your device vulnerable to glitches affecting speed and stability.
Make it a habit to check for firmware updates regularly. Updated firmware often includes better traffic management and enhanced support for gaming features. I once ignored an update and experienced constant lag until I installed the latest version—your experience might be similar.
Using Wired Connections
Wi-Fi is convenient but prone to interference and signal drops, which can cause lag during critical gaming moments. A wired Ethernet connection provides a direct, stable link with minimal latency.
- Use a Cat5e or higher Ethernet cable for optimal speeds.
- Connect your gaming device directly to the router’s LAN port.
- Keep cable length reasonable to avoid signal degradation.
Have you tried switching from Wi-Fi to a wired connection? The difference in responsiveness is often night and day.
Credit: thepihut.com
Frequently Asked Questions
What Is A Static Ip And Why Use It For Gaming Routers?
A static IP is a fixed address assigned to your device. It improves gaming stability by reducing connection drops and lag. Static IPs help in port forwarding, essential for smooth multiplayer gaming and better network performance.
How Do I Assign A Static Ip On My Gaming Router?
Access your router’s admin panel through a web browser. Find the DHCP or LAN settings and reserve an IP for your device’s MAC address. Save changes and restart your router for the static IP to take effect.
Can Setting A Static Ip Improve Online Gaming Speed?
Yes, a static IP can reduce latency and connection issues. It provides a stable network path, minimizing interruptions during gameplay. However, overall speed depends on your ISP and network hardware as well.
Is It Safe To Set A Static Ip On My Router?
Setting a static IP is safe when done correctly. Avoid IP conflicts by choosing an unused address within your router’s range. This prevents network issues and keeps your gaming experience smooth.
Conclusion
Setting a static IP on your gaming router helps keep your connection steady. It stops your IP address from changing and makes gaming smoother. You control your network better and avoid common connection problems. The steps are simple and worth the small effort.
Try it out to enjoy a more stable gaming experience every time. A steady connection means less lag and more fun. Give your gaming setup the boost it needs today.